16. Warnings, Errors and Troubleshooting
If the instrument encounters a problem, it enters a different state, depending on the severity of the issue. There are warnings, noncritical errors and critical errors, each having different implications and requiring different actions.
16.1 Warnings
Warnings appear when unusual behaviour is detected during an otherwise successful measurement. They can indicate reduced accuracy of the measurement results or indicate impending errors. Unlike errors, warnings do not prevent the instrument from functioning, but users should pay attention to them as they can indicate sources of inaccuracies.
| WARNING | IMAGE |
|---|---|
| When unusual behavior is detected, a warning is shown next to the measurement results. More information on the warning can be found by clicking on the corresponding warning entry next to the measurement results or directly in the warning log. | 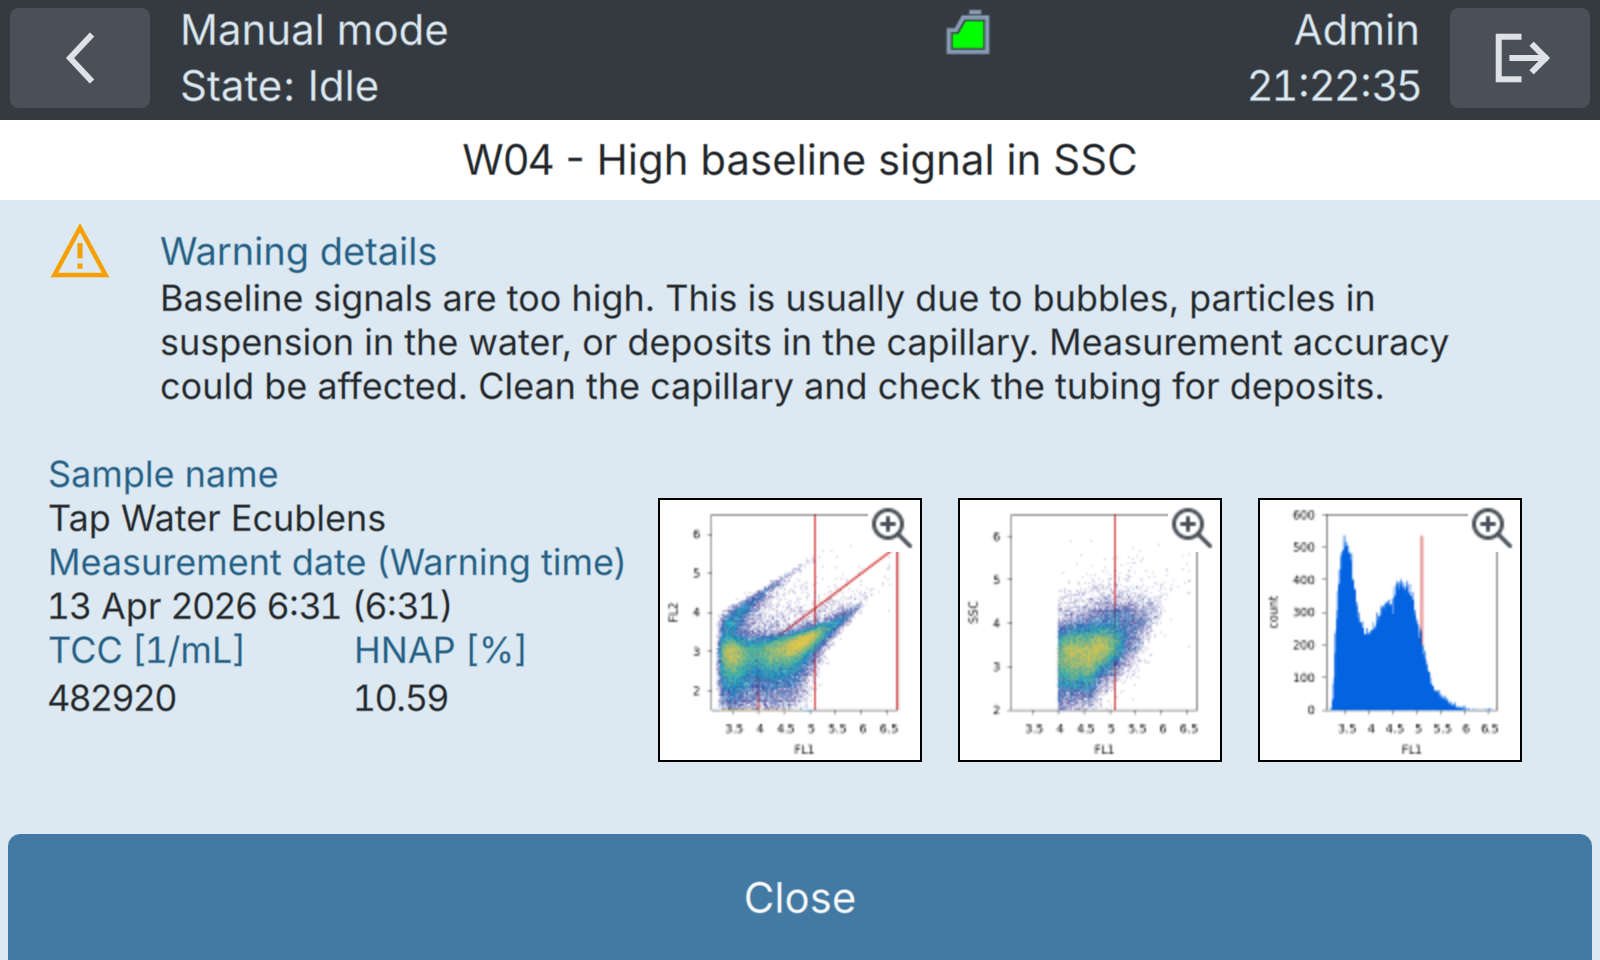 |
The following warning messages can be displayed:
Table 16-1 Warnings
| ERROR CODE | NAME | DESCRIPTION | CAUSES / WHAT TO DO |
|---|---|---|---|
| W01 | Cartridge expired | Cartridge reagents have expired. Measurement accuracy could be affected. | • Please replace the cartridge as soon as possible. |
| W02-04 | High baseline signal in FL1 / FL2 / SSC | Baseline signals are too high. This is usually due to bubbles or particles in suspension in the sample. Measurement accuracy could be affected. | • Check the inlet tubing for any signs of deposits. • Check the water connections, be sure that they are all tight (no air entry). • If the warning persists, please perform cleaning of instrument with the cleaning kit. |
| W05 | Incubator temperature off target | Temperature during incubation was more than 2 °C off target. Cell counts may be affected. The incubator may be defective. | • If the problem persists, please contact customer service. |
| W06 | No events detected | No events detected during the measurement. | • If the problem persists, please contact customer service. |
| W07 | TCC out of range | TCC is above the specification limit of BactoSense of 2’000’000 cells/ml. | • Please dilute the sample to ensure accuracy of the measurement. |
| W08 | Air bubbles detected | The sample appears to contain air bubbles. | • Check sampling device is installed properly. • Check the sample for bubbles. • If using online sampling device, check water is supplied at correct pressure. |
| W10 | Enclosure too cold | Enclosure is too cold, rapid heating has been activated before continuing protocol. | • Instrument cannot safely operate if internal temperature is too cold. • Rapid heating attempts to heat the enclosure to ensure safe operations. • Measurements will start once internal temperature is sufficient. |
| W11 | Service required | Service of the instrument is required. Measurement precision can no longer be guaranteed. Continued operation can lead to leaks, which can damage the instrument. | • Next service date is overdue. • Valve and plunger have reached end of life. • Please contact your service representative. |
| W13 | Laser end of life | Laser has reached end of life. | • Please contact your service representative. |
| W14 | Non-critical power cut | The instrument was powered off unexpectedly. | • Ensure the cleanliness of the instrument. • If the issue occurs frequently, install an uninterruptible power supply |
16.2 Non-critical errors
Non-critical errors prevent a measurement from terminating successfully, but do not prevent the instrument from running another measurement afterwards. These errors do not require human intervention. Some non-critical errors are promoted to critical errors if they repeat three times.
| NON-CRITICAL ERRORS | |
|---|---|
| The protocol stops. The cause of the error is usually fixed by repeating the analysis or waiting. • Another measurement can immediately be started. If it completes successfully, the error state is cleared. • More information on the error can be found in the error log, by clicking on the corresponding error entry. | 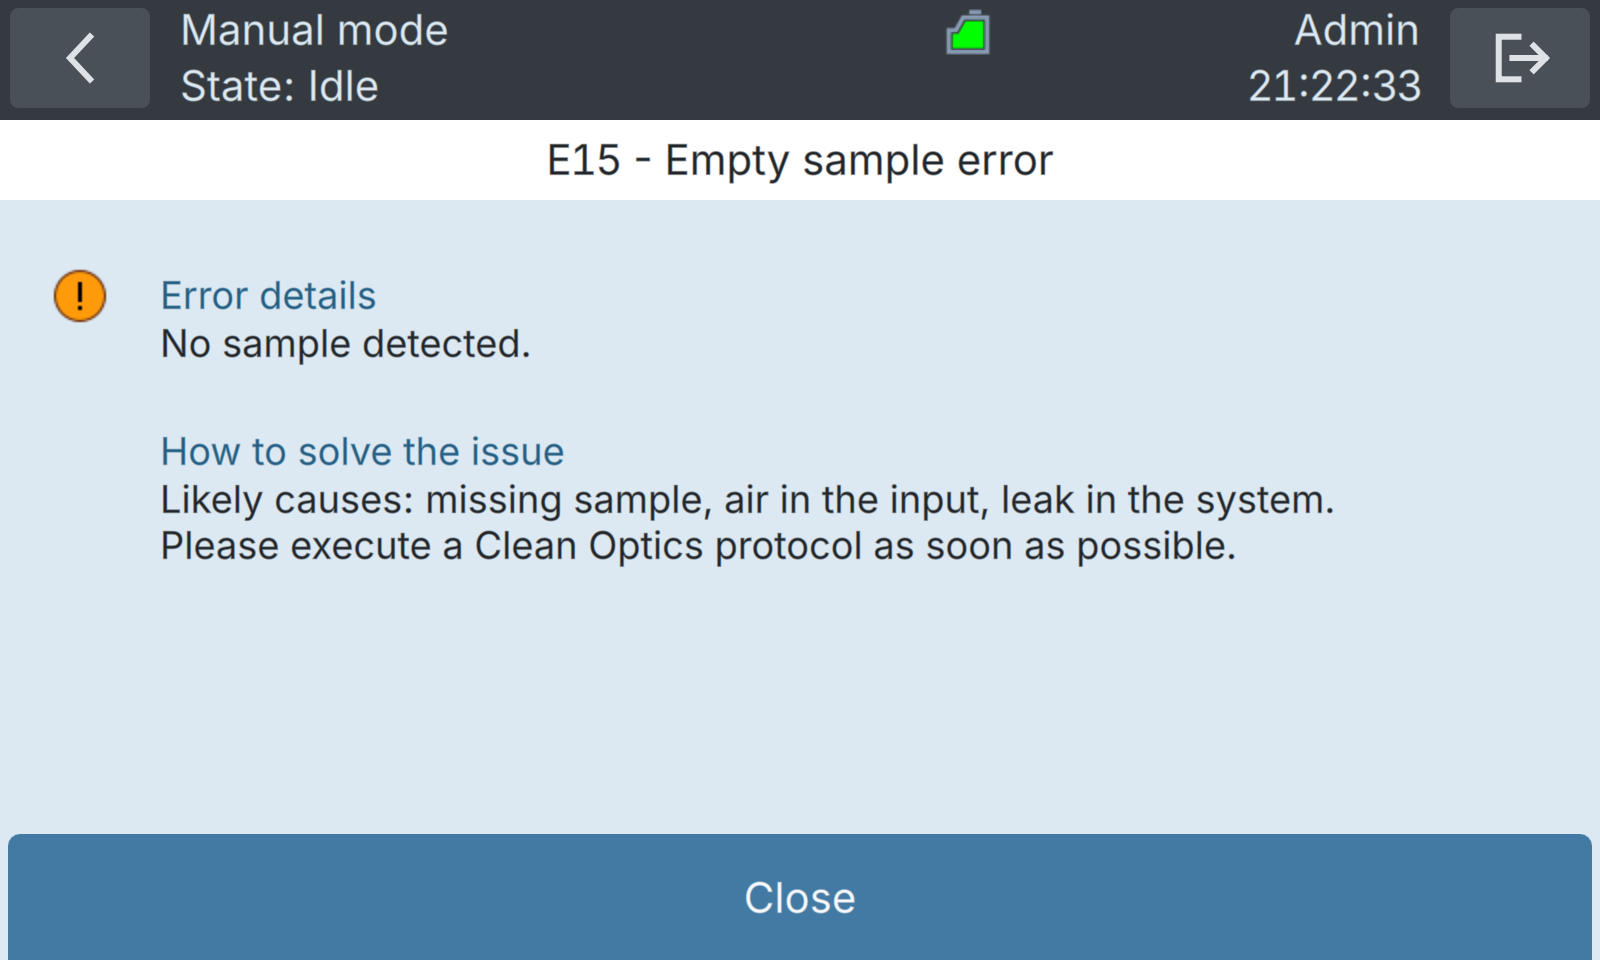 |
The following non-critical error messages can be displayed:
Table 16-2 List of non-critical errors.
| ERROR CODE | NAME | DESCRIPTION | CAUSES / WHAT TO DO |
|---|---|---|---|
| E01 | Cartridge door open | Cartridge door is open and prevents measurements from running. | • Close door and retry the measurement. |
| E08 | Enclosure too damp | Enclosure humidity is too high for safe operation. | • Replace desiccant bag, by unscrewing the large cap on the left-hand-side of the instrument (see Replacement of the desiccant bag). • If the problem persists, please contact customer service. |
| E09 | System overheated | Inside temperature is too high for safe operation. | • Reduce ambient temperature or increase measurement interval to allow instrument to cool down. |
| E14 | Laser too hot | Laser temperature is too high for safe operation. | • Reduce ambient temperature or increase measurement interval to allow instrument to cool down. |
| E15 | Mixer inflation error | Underpressure detected during mix or dispense. | • Missing sample. • Air in the input. • Leak in the system. • Please execute the Clean Optics protocol (see Overview of protocols in manual mode). |
| E18 | Pump underpressure error | Underpressure detected during dispense. | • Missing sample. • Air in the input. • Leak in the system. • Please execute the Clean Optics protocol (see Overview of protocols in manual mode). |
| E19 | System overheated | The inner temperature is too high for operation. | • Reduce ambient temperature, or increase measurement interval to allow instrument to cool down. |
| E33 | Processing memory overflow | Signal processing circuits memory has overflown. | • Please execute the Clean Optics protocol (see Overview of protocols in manual mode). • Retry the measurement. |
| E42 | Enclosure too cold despite heating | Enclosure temperature remains too cold after heating procedure. | • Ambient temperature is less than 5 °C (41 °F). • Increase ambient temperature. |
| E44 | Pump module startup error | The pump module failed to power on correctly. | • Simply retry the measurement. |
| E45 | Low valid volume ratio error | The valid volume ratio is too low. This can be caused by a too elevated bacterial content in the water or turbidity/debris. | • The accuracy of the measurement is probably very low. Repeat the measurement while diluting the sample with clear water. |
| E46 | Cartridge is still busy | The cartridge was still initializing when the measurement started. | • Non-critical error. Repeat the measurement. If the problem persists, contact a service technician. |
| E48 | Microfluidic subsystem busy | The microfluidic controller is performing another task while the measurement was taken. | • Non-critical error. Repeat the measurement. If the problem persists, contact a service technician. |
| E49 | GPIO Timeout error | The processing board is waiting for another module to respond. | • Non-critical error. Repeat the measurement. If the problem persists, contact a service technician. |
| E50 | Pump motion blocked | The motion of the pump is blocked. | • Non-critical error. Repeat the measurement. If the problem persists, contact a service technician. |
| E51 | Unable to get temperature reading | Unable to get temperature reading. The control loop is thus disabled. | • Non-critical error. Repeat the measurement. If the problem persists, contact a service technician. |
| E52 | Cartridge valve motion blocked | The motion of the cartridge valve is blocked. | • Non-critical error. Repeat the measurement. If the problem persists, contact customer service. |
| E55 | M7 not connected | The acquisition processor cannot be initialized. | • Reboot the instrument. • If the problem persists, contact customer service. |
| E56 | Empty acquisition | No events detected during acquisition | • Clean the sampling device using the Washstation, then perform a measurement of clean water. • If the problem persists, contact customer service. |
| E57 | Cartridge busy (special command busy) | Communication with the cartridge failed. | • Non-critical error. Repeat the measurement. • If the problem persists, contact customer service. |
| E58 | Cartridge busy (timeout) | Communication with the cartridge failed. | • Check the electronic connector between the cartridge and the instrument. • Repeat the measurement. • If the problem persists, contact customer service. |
| E59 | Valve sensor error | Unable to read valve position. | • Please contact customer service. |
16.3 Critical errors
Critical errors interrupt the workflows of the instrument and require human intervention. The error source needs to be eliminated and the instrument set to running conditions again. Critical errors need to be cleared.
| CRITICAL ERRORS | IMAGE |
|---|---|
| If a critical error occurs during operation, it has the following effects: • The protocol immediately stops. • The instrument goes into a critical error state, and manual intervention is needed before any new protocol can be launched. • The cause of the error must be solved by an operator. The errors can then be manually cleared from the Error log, as described in Error and warning logs and Clearing errors. | 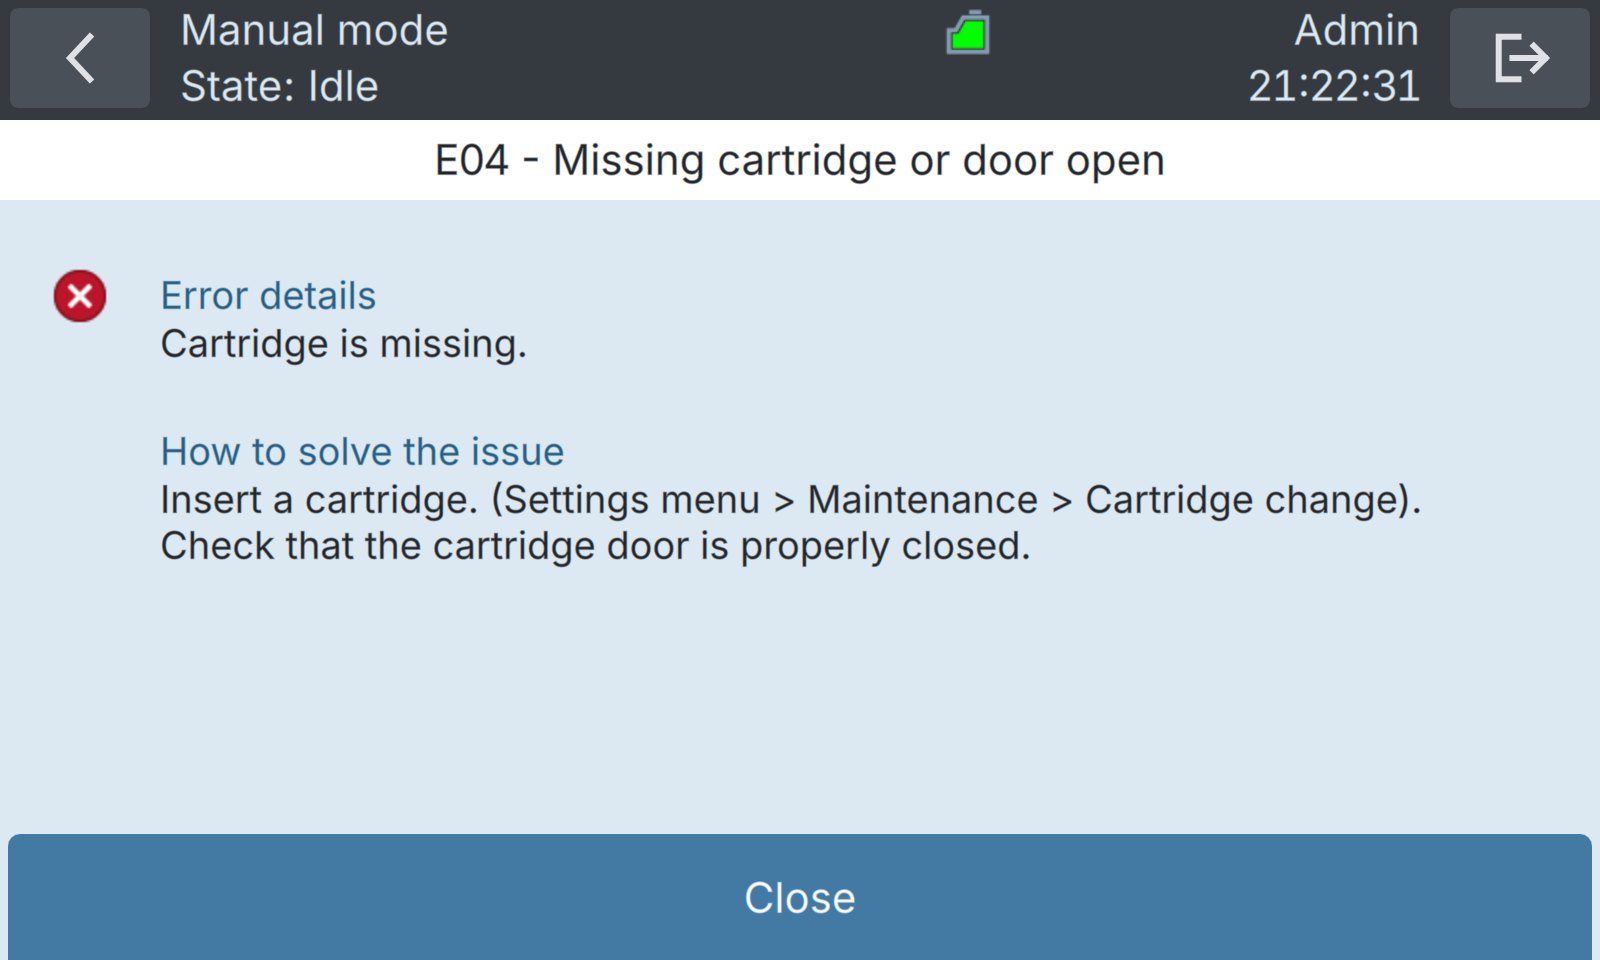 |
The following critical error messages can be displayed:
Table 16-3 List of critical errors.
| ERROR CODE | NAME | DESCRIPTION | CAUSES / WHAT TO DO |
|---|---|---|---|
| E00 | General error | Unhandled error. | • Please contact customer service |
| E02 | Cartridge empty | Cartridge is empty. | • Replace cartridge (see Change cartridges) |
| E04 | Cartridge missing | Cartridge is missing. | • Insert a cartridge (see Installing a cartridge) |
| E05 | Full waste bag | Cartridge waste bag is full. | • Replace cartridge (see Change cartridges) |
| E06 | Cartridge communication impossible | Cartridge is disconnected, door is open, or cartridge electronics are damaged. | • Make sure the cartridge’s electronic cable is connected properly, and that the door is properly closed. • If that doesn’t help, replace the cartridge and inform customer service. |
| E07 | Storage disk full | Insufficient storage space to continue operation. | • Delete old measurements and try again (see Clearing of disk space) • This will delete the measurements permanently from the device. • Export measurements as backup solution. |
| E12 | FPGA initialization error | Failed to initialize the signal processing chip. | • Reboot the instrument. |
| E16 | Processing error | An error was discovered while processing the signals. | • The accuracy of the latest result is not guaranteed. Please repeat the analysis. |
| E17 | Overpressure detected | Overpressure detected during dispense. | • Likely cause: The output filter is probably clogged. • Optical flow cell blocked. • Please call customer service. |
| E20 | Abnormal shutdown | Protocol interrupted for unknown reasons, usually due to a power cut. | • Usually indicates a power cut, or other external interruption to the measurement. • Perform a Clean Optics and Clean Sampling Device protocol before starting a new measurement (see Overview of protocols in manual mode). |
| E23 | Temperature Sensor Communication Error | Communication with temperature sensor on IO board failed. | • Please contact customer service. |
| E24 | Laser Communication Error | Communication with optical unit failed. | • Please contact customer service. |
| E25 | Pump Communication Error | Communication with pump module impossible. | • Please contact customer service. |
| E26 | Power Supply Communication Error | Communication with power supply module impossible. | • Please contact customer service. |
| E27 | Pump Communication timeout | Communication with pump module timed out. | • The cartridge door is open. • A cable is disconnected. • A circuit board is damaged, either in the pump or cartridge. |
| E28 | Empty dye supply | Dye tube connected to cartridge is empty. | • The tube is disconnected. • Cartridge is defective. • Repeat the cartridge change procedure, making sure that all tubes are properly connected. |
| E29 | Empty rinse fluid supply | Rinse fluid tube connected to cartridge is empty. | • The tube is disconnected. • Cartridge is defective. • Repeat the cartridge change procedure, making sure that all tubes are properly connected. |
| E30 | Empty bleach supply | Bleach tube connected to cartridge is empty | • The tube is disconnected. • Cartridge is defective. • Repeat the cartridge change procedure, making sure that all tubes are properly connected. |
| E31 | Cartridge electronics failure | Cartridge level can no longer be determined accurately. | • Replace cartridge and contact customer service. |
| E32 | Incompatible cartridge | Cartridge type is incompatible with this instrument or software. | • Make sure that you have the correct cartridge type for this instrument. |
| E33 | Processing memory overflow | Signal processing circuits memory has overflowed. | • Please execute the Clean Optics protocol (see Overview of protocols in manual mode). • Retry the measurement. |
| E38 | Cartridge not ready error | The new cartridge has not been initialized correctly | • Execute the “Cartridge Change” procedure (see Change cartridges). |
| E39 | Laser current limit reached | The laser has reached its upper current limit; indicating end of life. | • The laser needs to be replaced. Contact a service technician. |
| E40 | Set of gates not found | Reference to the set of gates selected for the measurement cannot be found in the instrument settings. | • The set of gates has been deleted. • Change the set of gates and retry the measurement. |
| E41 | Set of gates incompatible | The set of gates selected for the measurement cannot be used with this cartridge. | • Correct cartridge change procedure was not followed. • Incorrect digital input configuration. • Change the set of gates and retry the measurement. |
| E43 | External temperature too low | Ambient temperature is outside of the instrument specifications. | • Increase ambient temperature. • Trying to operate or store the instrument below 5 °C (41 °F) can cause damage to the device. |
| E47 | Unable to find main reference magnet during homing | During initialization, the valve did not home properly. | • Please contact customer service. |
| E53 | Unable to communicate with motor | The communication to the motor controller of the mixer is defective. | • Please contact customer service. |
| E54 | Laser temperature sensor error | Unable to get the laser temperature. | • Please contact customer service. |
16.4 Error and warning logs
On the Home screen, press Settings, then Logs. Select Error log or Warning log to open the corresponding log.
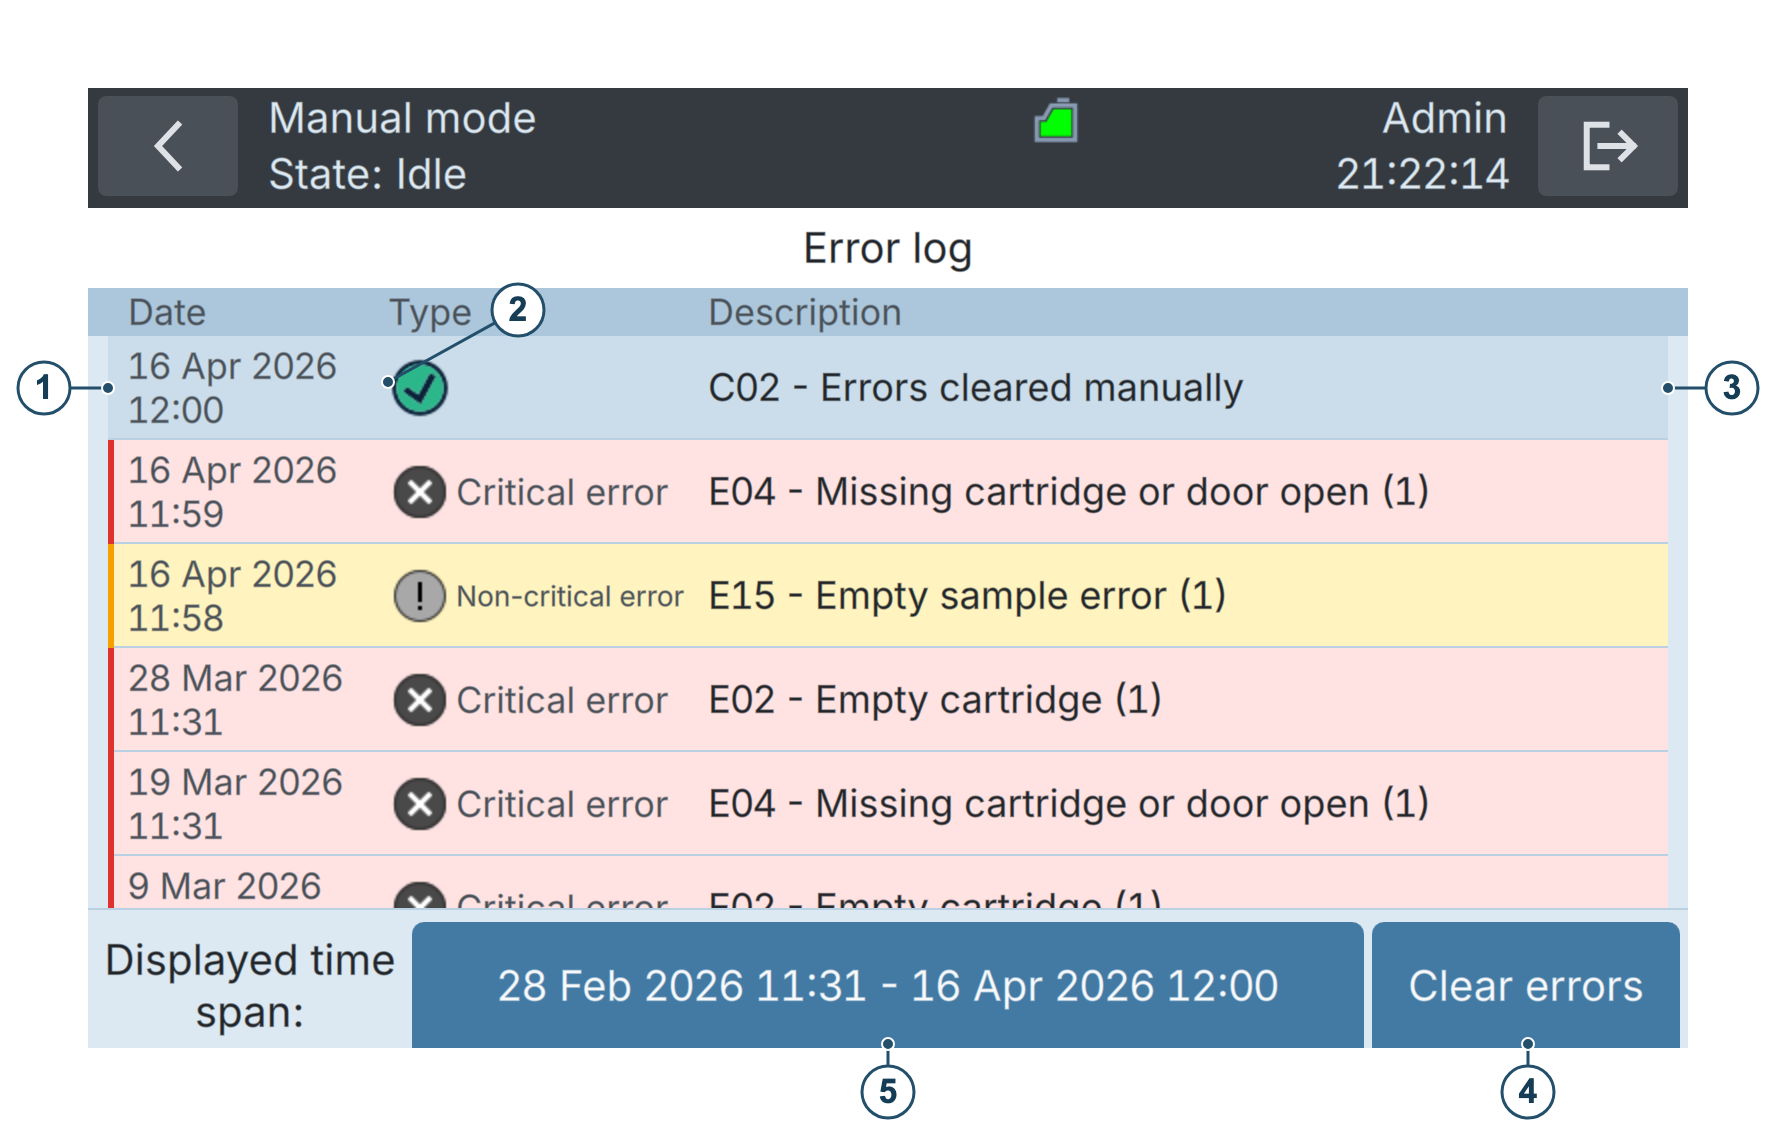
Figure 16-1 : Error logs
① | Date and time of the event | ② | Type of the event | |
| Critical error | |||
| Non-critical error | |||
| Errors cleared | |||
③ | Short description of the error or event | ④ | Button to manually clear errors (available to Basic, Advanced and Admin users when the instrument is idle) | |
⑤ | Date range of displayed events. Click to change the range. | |||


Selecting any event on the list leads to a page with more information on the cause of the error and recommended resolution steps.
16.5 Clearing errors
Critical errors must be cleared manually. Make sure to first solve the origin of the problem, then manually clear the error with the steps below. Please note that the procedure below does not automatically solve the root cause of the error.
| WORK STEP | ADDITIONAL INFO / IMAGE | |
|---|---|---|
| 1. | On the Home screen, press Settings to open the settings menu. | |
| 2. | Press Logs, then Error log. | |
| 3. | Make sure you have resolved the problem leading to the displayed error(s). Then press the Clear errors button. | 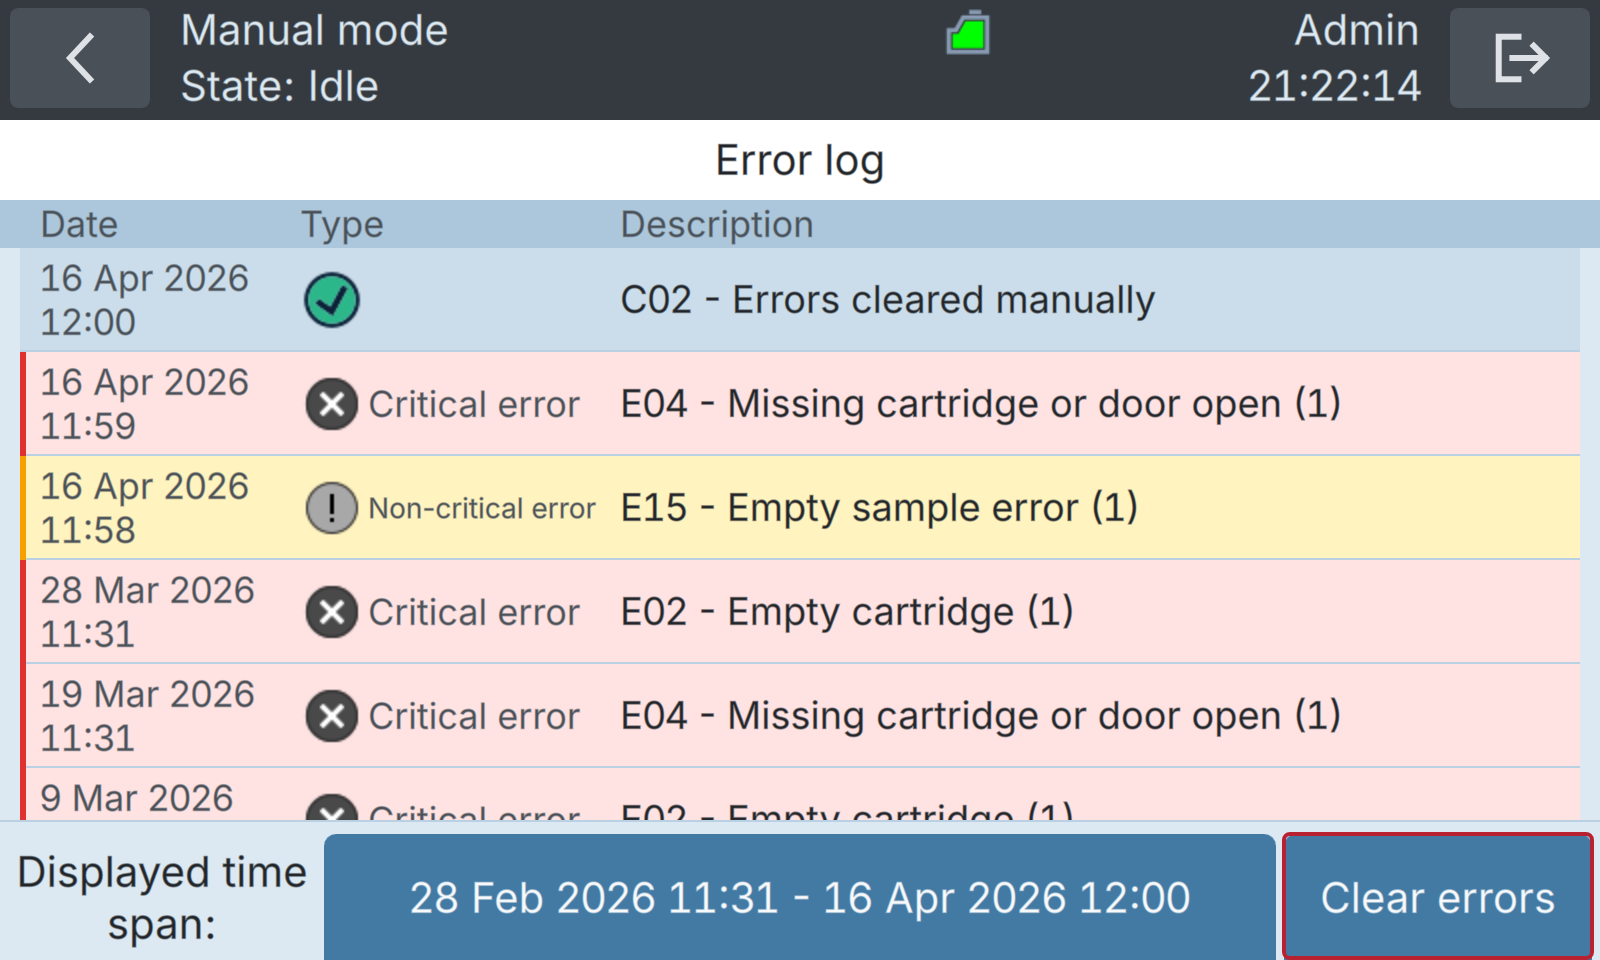 |
| 4. | Cleared errors appear with grey error symbols and an “Errors cleared” event is added to the log. The instrument is ready to analyze again. |
16.6 Automatic self-check
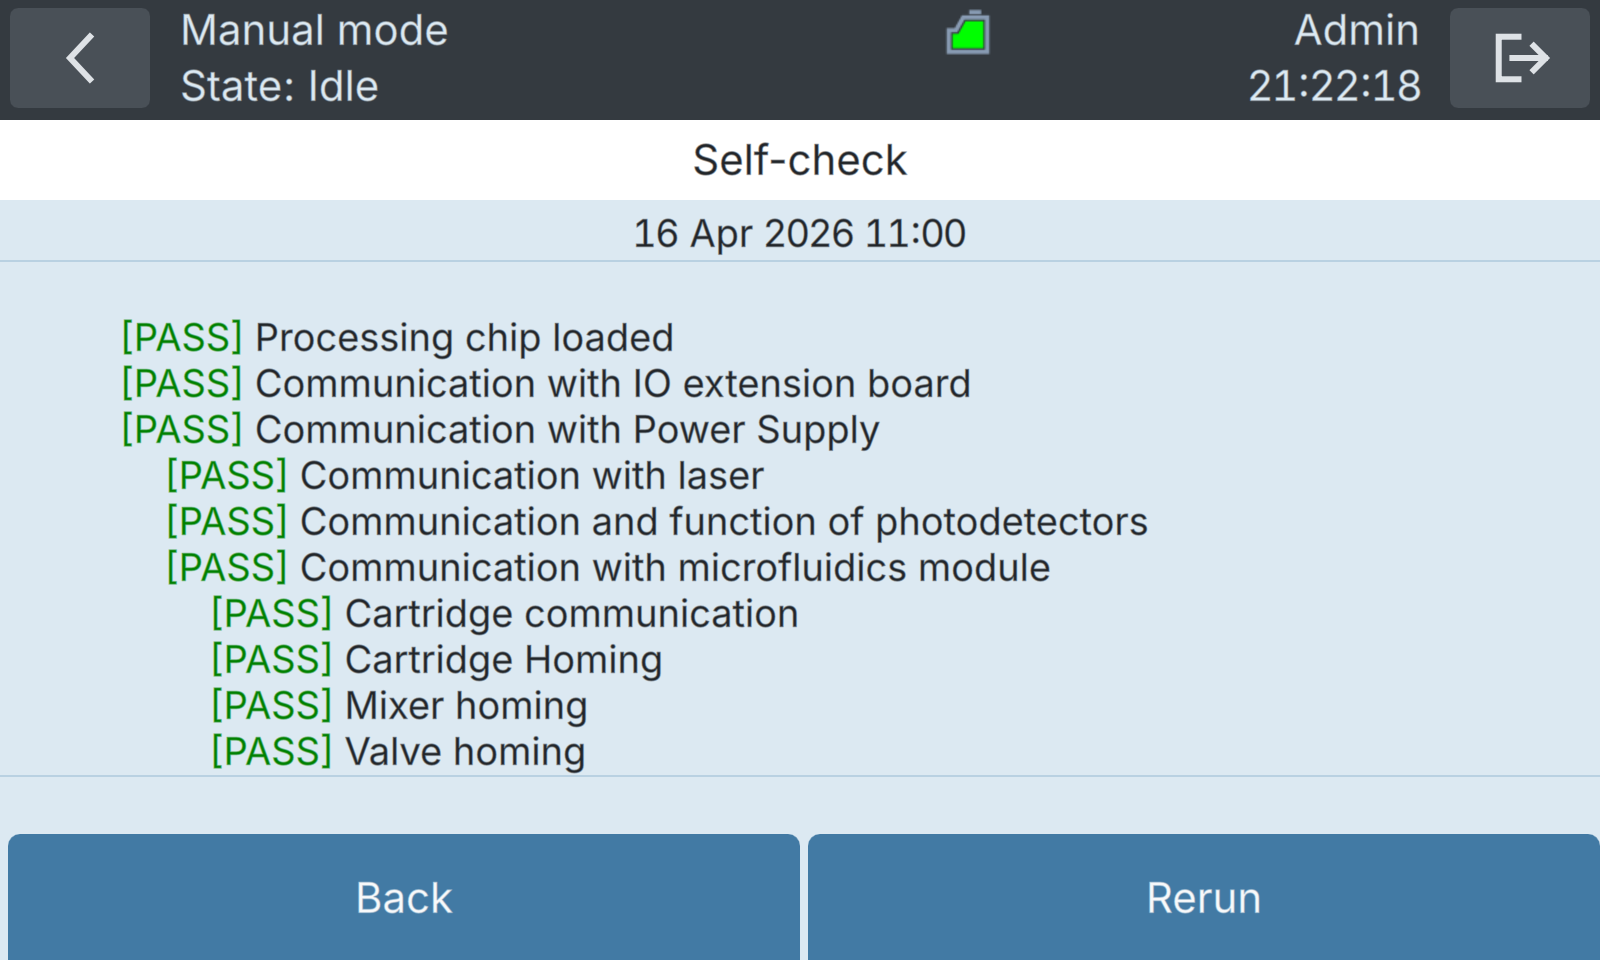
The automatic self-check tool checks that each component of the BactoSense is functioning correctly and identifies those that are not. It can be used to identify problems with the instrument.
WORK STEP | ADDITIONAL INFO / IMAGE | |
|---|---|---|
1. | As an Advanced or Admin user, press Settings on the Home screen to open the settings menu. | |
2. | Press the Maintenance button. | |
3. | Press the Self-check button. | |
4. | Additional information Press the Rerun button. Once execution has terminated, the instrument shows a list of all tests, with a green PASS or red FAIL indicator. Some tests may be skipped: if the system cannot communicate with the cartridge, all the tests that require cartridge communication are skipped. |
|
16.7 Operation at low temperature
The instrument must be operated within a specific temperature range to prevent damage and ensure reliable and reproducible measurement results (see Technical data). At very low and very high ambient temperatures (below 5 °C (41 °F) or above 30 °C (86 °F)), protocols are not executed. At low ambient temperatures, the instrument automatically warms up prior to a measurement to reach the required temperature. During this heating process, the instrument status shows “Heating...”. If the target temperature cannot be reached after several hours, the protocol exits with an error (table 16-2, E42).
Measurements can be delayed if extensive heating is necessary. To avoid this, keep the instrument temperature above 10 °C (50 °F).
16.8 Troubleshooting
The following table provides an overview of issues and resolutions. If the issue cannot be resolved, please contact your local service representative or bNovate customer service. Contact information for bNovate customer service can be found in Contacting customer service.
Table 16-4 Troubleshooting instructions
| OBSERVATION | INSTRUCTION |
| Nothing on display | • Check whether the BactoSense is connected to power and switched on. |
| Unresponsive or flickering user interface | • Potential electromagnetic interference from nearby machine (e.g. pump). Relocate BactoSense. |
| Error message on the display | • Respond to the error message as described in this chapter. |
| The measurements appear to be wrong | • Ensure that the sample and operating conditions described in Technical data are met. • Check whether the instrument is correctly installed according to Installation. • Ensure that the servicing duties have been performed according to the servicing schedules described in Periodic preventive maintenance by service professional and Maintenance by the user. • Perform an instrument cleaning using the Cleaning Kit. • Perform an instrument validation using the Validation Kit. |