12. Data Access and Export
12.1 Export data to USB device
To export measurement data, refer to Export to a USB drive.
12.1.1 Export settings, diagnostics, or all to USB device
The “Special import/export” function allows users to export either all measurement data from the instrument, or to export only diagnostics data which can be interpreted by service technicians.
| WORK STEP | ADDITIONAL INFO / IMAGE | |
|---|---|---|
| 1. | As an Advanced or Admin user, press Settings on the Home screen to open the settings menu. | |
| 2. | Press the Maintenance button. Press the Special export import button. | |
| 3. | Connect a USB mass storage device. The USB flash drive should be formatted in FAT32. If needed, press the Refresh USB list button until the device is displayed. | |
| 4. | The name of the folder which will be created on the USB device is displayed in the Folder name field. Enter a new folder name if desired. | 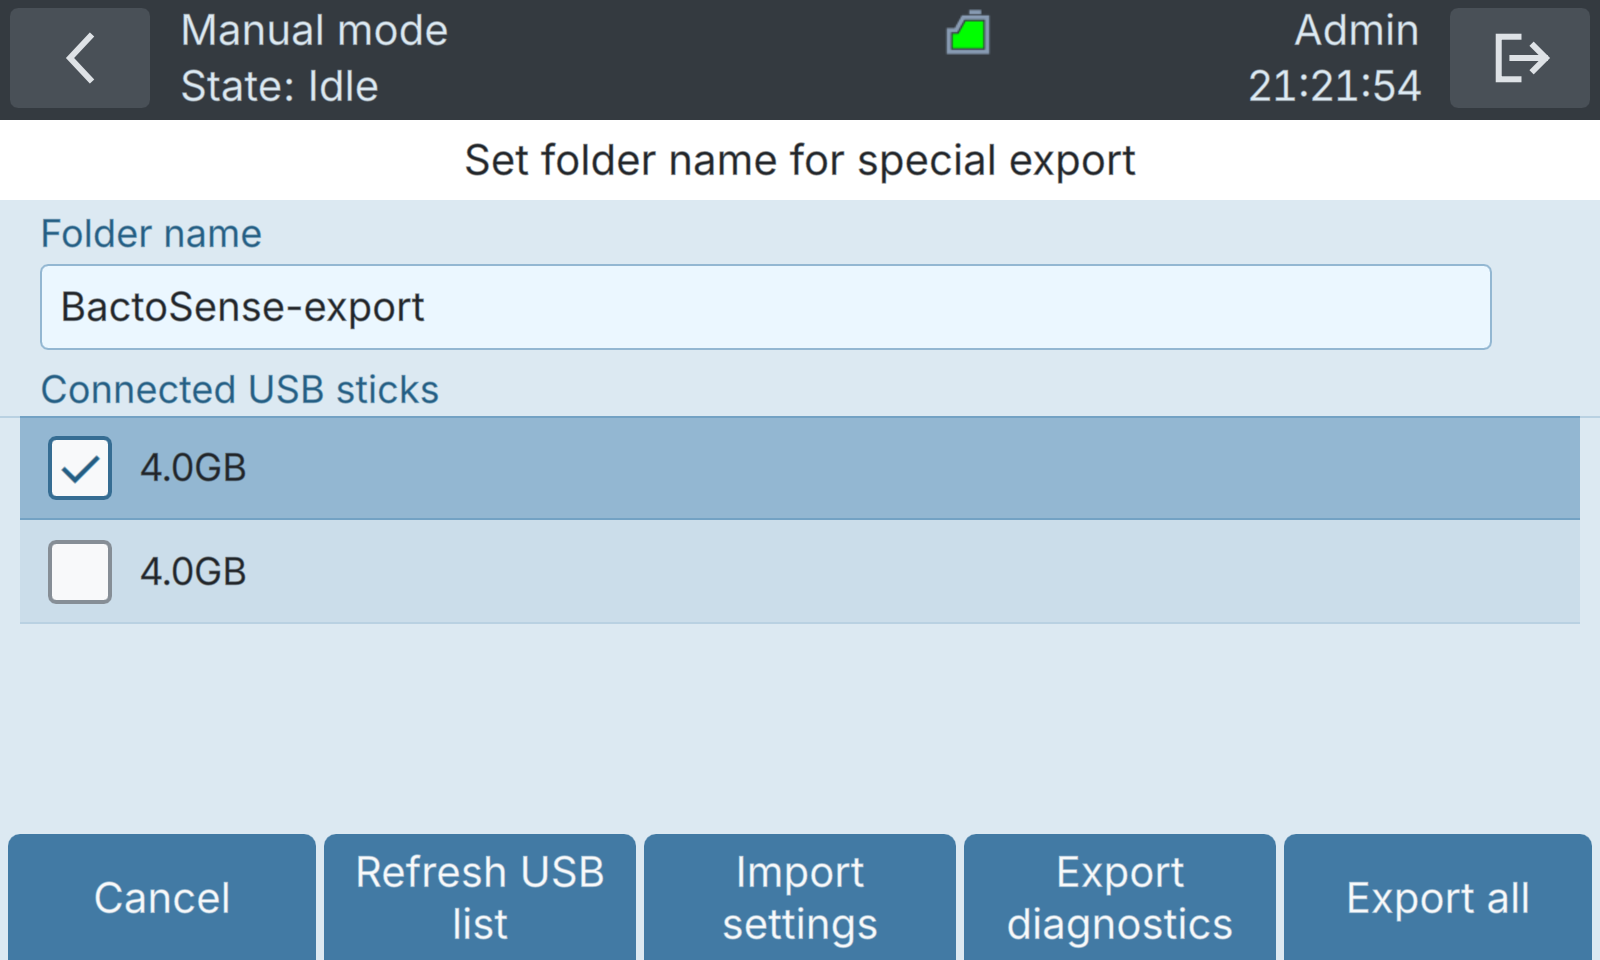 |
| 5. | • To export all data, press the Export all button. • To export diagnostics data, press the Export diagnostics button. • To export settings, press the Export diagnostics button. Do not remove the USB mass storage device during the data transfer. | Exporting all data can take several hours. If the available storage capacity of the USB mass storage device is too small, a notification will be shown. |
| 6. | After completion of the export, press the OK button and remove the USB device. |
12.2 Retrieve data via FTP
BactoSense data can be remotely accessed using the FTP protocol (RFC 3659).
- FTP authentication uses the username/password pairs used in the GUI of the instrument. Default account names are: basic, advanced, and admin.
- The CSV and Excel files are generated on-the-fly, and thus always contain the latest measurement data.
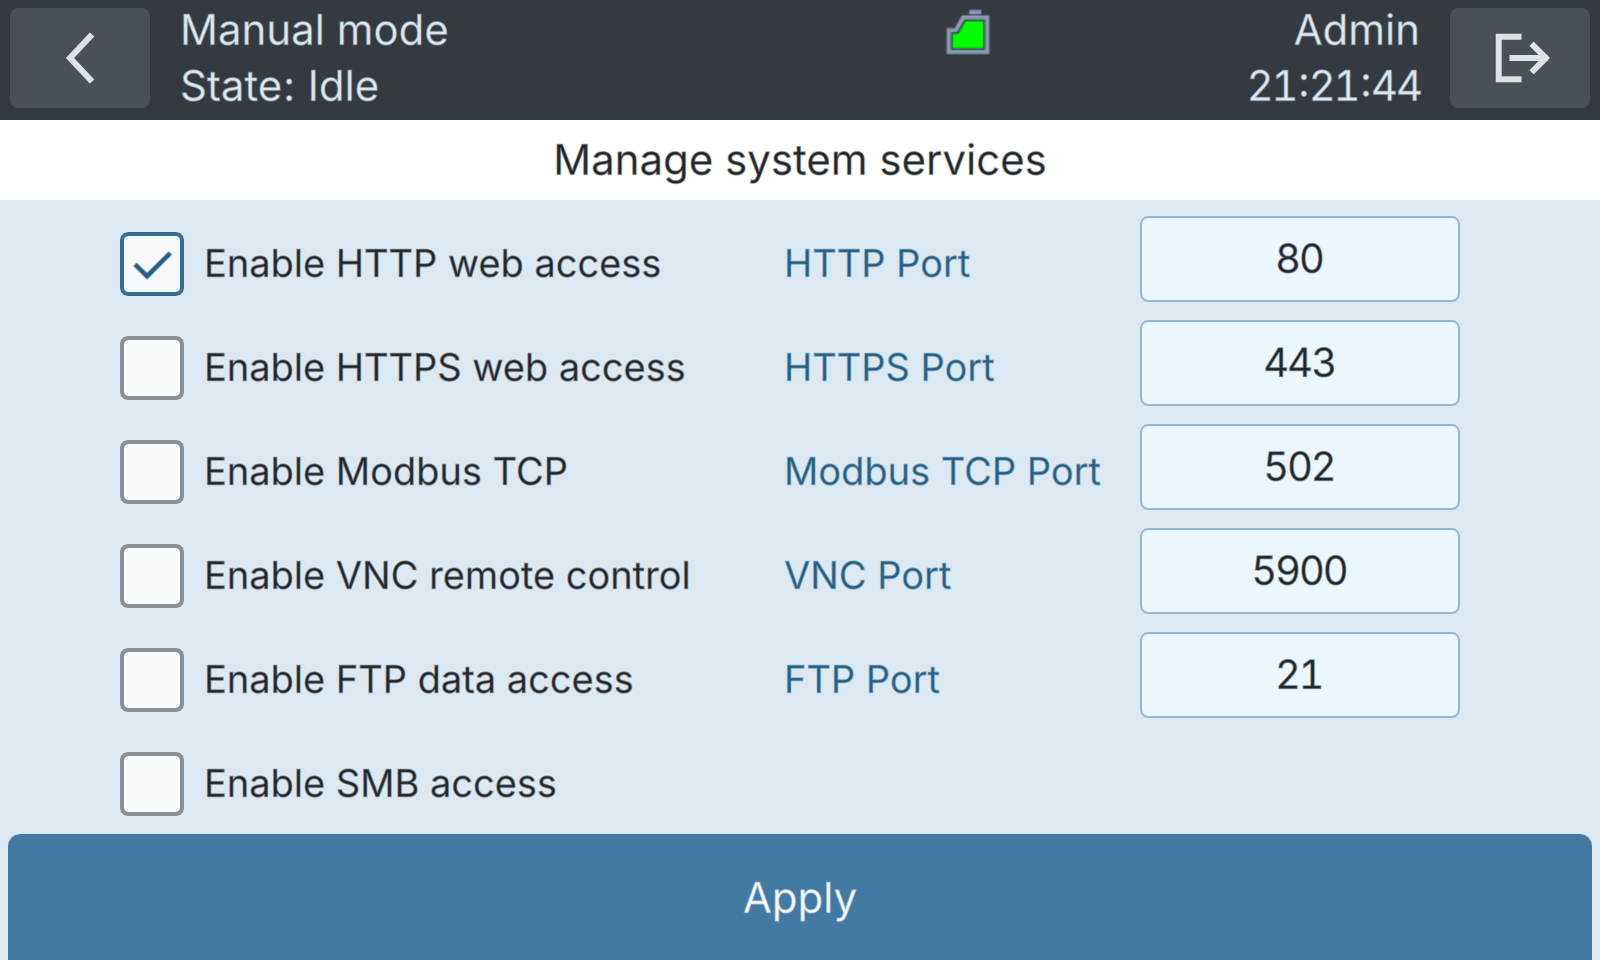
Figure 12-1 The Manage services view of the BactoSense user interface.
| WORK STEP | ADDITIONAL INFO / IMAGE | |
|---|---|---|
| 1. | • Install an FTP client on the device you want to use to retrieve data, e.g. your laptop. • Alternatively, the Windows file explorer can be used. | |
| 2. | Connect the BactoSense via Ethernet to a safe network (e.g. LAN). Connect your device to the same network. | For information about network configurations (i.e. static and dynamic IP settings), refer to Network configuration. |
| 3. | As an Admin user, press Settings on the Home screen to open the settings menu. | |
| 4. | Press the System settings button. | |
| 5. | Press the System services button. | |
| 6. | Make sure the Enable FTP data access check box is checked. | |
| 7. | Choose a port for the FTP server. | The default port is port 21. |
| 8. | Press Apply to save the changes. If a reboot is requested, press Reboot now. | Only needed in case you changed the configuration. |
| 9. | On the Home screen, press Settings, then System info to retrieve the IP address of the BactoSense. | For information about network configurations (i.e. static and dynamic IP settings), refer to Network configuration. |
| 10. | For FTP client: Open the client and enter the login details. For the Windows file explorer: Enter the following address in the address bar: ftp://user:password@ip:port | • User/username: Username to log in to the BactoSense • Password: Password to log in to the BactoSense • Host/ip: IP address of the BactoSense • Port: Port configured in System services view (see figure 12-1) |
12.3 Retrieve files via HTTP or HTTPS
The HTTP and HTTPS servers are enabled by default and available through a web browser or any HTTP request library. Use the following procedure to retrieve specific files via HTTP or HTTPS. As an alternative, consider the web interface (Web User Interface) or FTP (Retrieve data via FTP).
WORK STEP | ADDITIONAL INFO / IMAGE | |||||||||||||
|---|---|---|---|---|---|---|---|---|---|---|---|---|---|---|
1. | Connect the BactoSense via Ethernet to a safe network (e.g. LAN). Connect your device to the same network. | For information about network configurations (i.e. static and dynamic IP settings), refer to Network configuration. | ||||||||||||
2. | As an Admin user, press Settings on the Home screen to open the settings menu. | |||||||||||||
3. | Press the System settings button. | |||||||||||||
4. | Press the System services button. | |||||||||||||
5. | For HTTP: Make sure the Enable HTTP web access check box is checked. For HTTPS: Make sure the Enable HTTPS web access check box is checked. | |||||||||||||
6. | Choose a port for the HTTP or HTTPS server. | The default port for HTTP is 80. The default port for HTTPS is 443. | ||||||||||||
7. | Press Apply to save the changes. If a reboot is requested, press Reboot now. | Only needed in case you changed the configuration. | ||||||||||||
8. | On the Home screen, press Settings, then System info to retrieve the IP address of the BactoSense. | |||||||||||||
9. | Open a web browser on your device and enter the target file address into the address field. The file address has the following form: For HTTP:
| |||||||||||||
12.4 GUI relay using VNC
Virtual Network Computing (VNC) is a graphical desktop-sharing system to remotely control another computer. It transmits the keyboard and mouse input from one computer to another, relaying the graphical-screen updates, over a network. The embedded VNC server in the BactoSense is capable of sharing the user interface over the local area network (LAN) only (exception: remote access using a VPN).
VNC is an insecure protocol and is not recommended outside of a local network or with a VPN connection.
A VNC connection can slow down the user interface since it is very taxing in terms of processing power. Be sure to close your VNC connection after use.
| WORK STEP | ADDITIONAL INFO / IMAGE | |
|---|---|---|
| 1. | Install a VNC client on your computer. | |
| 2. | Connect the BactoSense via Ethernet to a safe network (LAN). Connect your computer to the same network. | For information about network configurations (i.e. static and dynamic IP settings), refer to Network configuration. |
| 3. | As an Admin user, press Settings on the Home screen to open the settings menu. | |
| 4. | Press the System settings button. | |
| 5. | Press the System services button. | |
| 6. | Make sure the Enable VNC remote control check box is checked. | |
| 7. | Choose a port for the VNC server. | The default port is port 5900. |
| 8. | Press Apply to save the changes. If a reboot is requested, press Reboot now. | Only needed in case you changed the configuration. |
| 9. | On the Home screen, press Settings, then System info to retrieve the IP address of the BactoSense. | |
| 10. | Open the VNC client on your computer and connect to the BactoSense using the IP address and port identified previously. | Your VNC client may allow you to change connection settings to optimize the speed of the connection if needed. |
| 11. | After finishing, return to System services, disable the VNC checkbox and press Apply. If a reboot is requested, press Reboot now. | The VNC connection can slow down the user interface on the BactoSense. |