8. General Operations and Configurations
8.1 Switching on and off
The power button of the BactoSense is located on the right hand-side of the instrument.
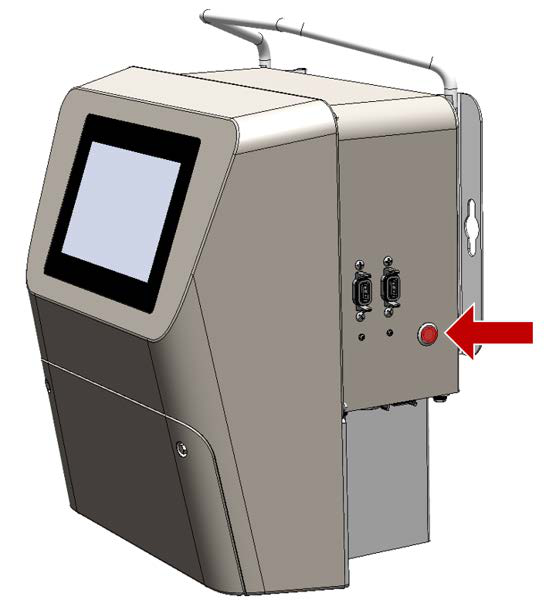
Figure 8-1 Power button of the BactoSense
Before switching the BactoSense on, make sure that the instrument is connected to a stable power supply meeting the requirements described in Connecting the BactoSense to power.
Switching on To switch the BactoSense on, shortly press on the power button. The power button LED lights up constantly and after a few seconds, the welcome screen is displayed on the user interface.
Switching off If you are logged in and want to switch the BactoSense off, tap on the logout button on the top right corner of the user interface and select Power off. If you want to switch off from the login page itself, press the power button for 10 seconds.
To disconnect the BactoSense from power, first switch the instrument off. Then unplug the power supply unit from the mains power source, before unplugging the power supply plug from the BactoSense.
8.2 Login, user roles and permissions
BactoSense operation requires users to log in. Different user roles with different permissions are available. The user role permissions are listed in User roles and permissions. All logins are password protected.
Login and logout can be performed using the login button displayed in the top right corner of the user interface. The currently active user role is displayed next to that button.
8.2.1 Login
| WORK STEP | |
|---|---|
| 1. | Press the login button on the top right corner of the user interface, or the login bar at the bottom in case you switched on the instrument. |
| 2. | For BactoSense CORE or BactoSense ID in the standard configuration: Select one of the user profiles Basic, Advanced or Admin. For BactoSense CORE or BactoSense ID upgraded with the Management package (see Management package) and advanced user management mode activated (see Activating advanced user management mode), enter your user ID. |
| 3. | Enter the password and press OK. If you don’t know the password, ask your Admin user. In a new instrument no passwords are set. In that case, follow the procedure described in Setting and changing passwords. |
| 4. | After logging in, you see the BactoSense user interface. |
| 5. | To log out, follow the procedure described in Manual logout. |
8.2.2 Manual logout
| WORK STEP | |
|---|---|
| 1. | Make sure all processes (e.g. measurements or cleanings) have completed. The idle state of the instrument is indicated on the left hand-side of the top bar of the BactoSense user interface. |
| 2. | Press the logout button in the top right corner of the user interface. |
| 3. | Select Log out / Lock screen. |
| 4. | To log in again, follow the procedure described in Login. |
8.2.3 Auto-logout
It is possible to configure an automated logout after predefined period of inactivity.
| WORK STEP | ADDITIONAL INFO / IMAGE | |
|---|---|---|
| 1. | As an Admin user, press Settings on the Home screen to open the settings menu. | |
| 2. | Press the System settings button. | |
| 3. | Press the Users button. | |
| 4. | Press the Settings button. | |
| 5. | Configure the desired auto-logout time period. | |
| 6. | Press Save. |
8.2.4 Activating advanced user management mode
With the Advanced User Management feature, an instrument admin can create different users and assign different user roles (Basic, Advanced, Admin). This allows to give different permissions to individual users, and log their activity for the audit trail.
Advanced user management mode is available for BactoSense SMART and PURE, and BactoSense CORE or BactoSense ID upgraded with the management package (see Management package).
| WORK STEP | ADDITIONAL INFO / IMAGE | |
|---|---|---|
| 1. | As an Admin user, press Settings on the Home screen to open the settings menu. | |
| 2. | Press the System settings button. | |
| 3. | Press the System configuration button. | |
| 4. | Check the Advanced user management mode checkbox. | |
| 5. | Press Save. |
8.2.5 Setting and changing passwords
Each user role is password protected.
Setting a password at first login Upon initial login with any user role, click OK when being prompted for a password. This action will initiate the guided process for configuring your password. The only exception is the service password, where a preset password is provided.
Setting and changing a passwords Each user profile can change its own password. Admin users are allowed to change passwords from other user profiles. The following procedure describes how to change passwords.
| WORK STEP | ADDITIONAL INFO / IMAGES | |
|---|---|---|
| 1. | On the Home screen, press Settings. Basic users press Change password; Advanced and Admin users press System settings, then Users. | |
| 2. | Select the user profile you want to edit, then press Edit. | Basic and Advanced users can change their own PIN. Admin users can also change the PIN of Basic and Advanced users. |
| 3. | Press Change PIN. Enter the new PIN in PIN and Confirm PIN, then press Save. |
8.2.6 Changing password settings
Several password features such as expiration, length etc can be configured.
| WORK STEP | ADDITIONAL INFO / IMAGE | |
|---|---|---|
| 1. | As an Admin user, press Settings on the Home screen to open the settings menu. | |
| 2. | Press the System settings button. | |
| 3. | Press the Users button. | |
| 4. | Press the Settings button. | |
| 5. | Configure the password requirements based on your preferences. | |
| 6. | Press Save. |
8.2.7 User roles and permissions
Table 8-1 User roles and permissions
| RIGHT | BASIC | ADVANCED | ADMIN |
|---|---|---|---|
| View last result | ✓ | ✓ | ✓ |
| View all results and export | ✓ | ✓ | ✓ |
| Start, stop, and schedule measurement | ✓ | ✓ | ✓ |
| Switch between Online and Manual mode | ✓ | ✓ | ✓ |
| View error and warning log | ✓ | ✓ | ✓ |
| Rename results | ✓ | ✓ | ✓ |
| Validate device | ✓ | ✓ | ✓ |
| Change their own password | ✓ | ✓ | ✓ |
| View system info | ✓ | ✓ | ✓ |
| See network settings | ✓ | ✓ | ✓ |
| View last self-check | ✓ | ✓ | ✓ |
| Change cartridge | ✓ | ✓ | ✓ |
| Clear errors | ✓ | ✓ | ✓ |
| See intervention log | ✓ | ✓ | ✓ |
| See validation results | ✓ | ✓ | ✓ |
| Delete results | ✓ | ✓ | |
| Re-gate results | ✓ | ✓ | |
| Adjust alarms | ✓ | ✓ | |
| Adjust gates | ✓ | ✓ | |
| Reboot | ✓ | ✓ | |
| Run a self check | ✓ | ✓ | |
| Delete old measurements | ✓ | ✓ | |
| Export all | ✓ | ✓ | |
| See intervention info | ✓ | ✓ | |
| Export diagnostics | ✓ | ✓ | |
| Change analogue and digital outputs | ✓ | ||
| Test analogue and digital outputs | ✓ | ||
| Change the passwords of other users | ✓ | ||
| Create other users | ✓ | ||
| Change authentication settings | ✓ | ||
| Set device name | ✓ | ||
| Set date and time | ✓ | ||
| Change network settings | ✓ | ||
| Change services settings | ✓ | ||
| Activate Modbus with key or deactivate | ✓ | ||
| Change language | ✓ | ||
| Switch to demo mode | ✓ | ||
| Reset settings | ✓ | ||
| Full factory reset (except intervention log) | ✓ | ||
| Import settings | ✓ | ||
| Change automatic power-on settings | ✓ | ||
| Activate upgrade packages with code | ✓ |
8.3 Basic configurations
8.3.1 Language of the user interface
The language can only be changed by admin users.
| WORK STEP | |
|---|---|
| 1. | As an Admin user, press Settings on the Home screen to open the settings menu. |
| 2. | Press the System settings button. Press the Language button. |
| 3. | Choose the language and press the OK button. |
| 4. | When prompted to reload the user interface, press Reload interface. |
8.3.2 Date and time
Date and time can only be changed by admin users.
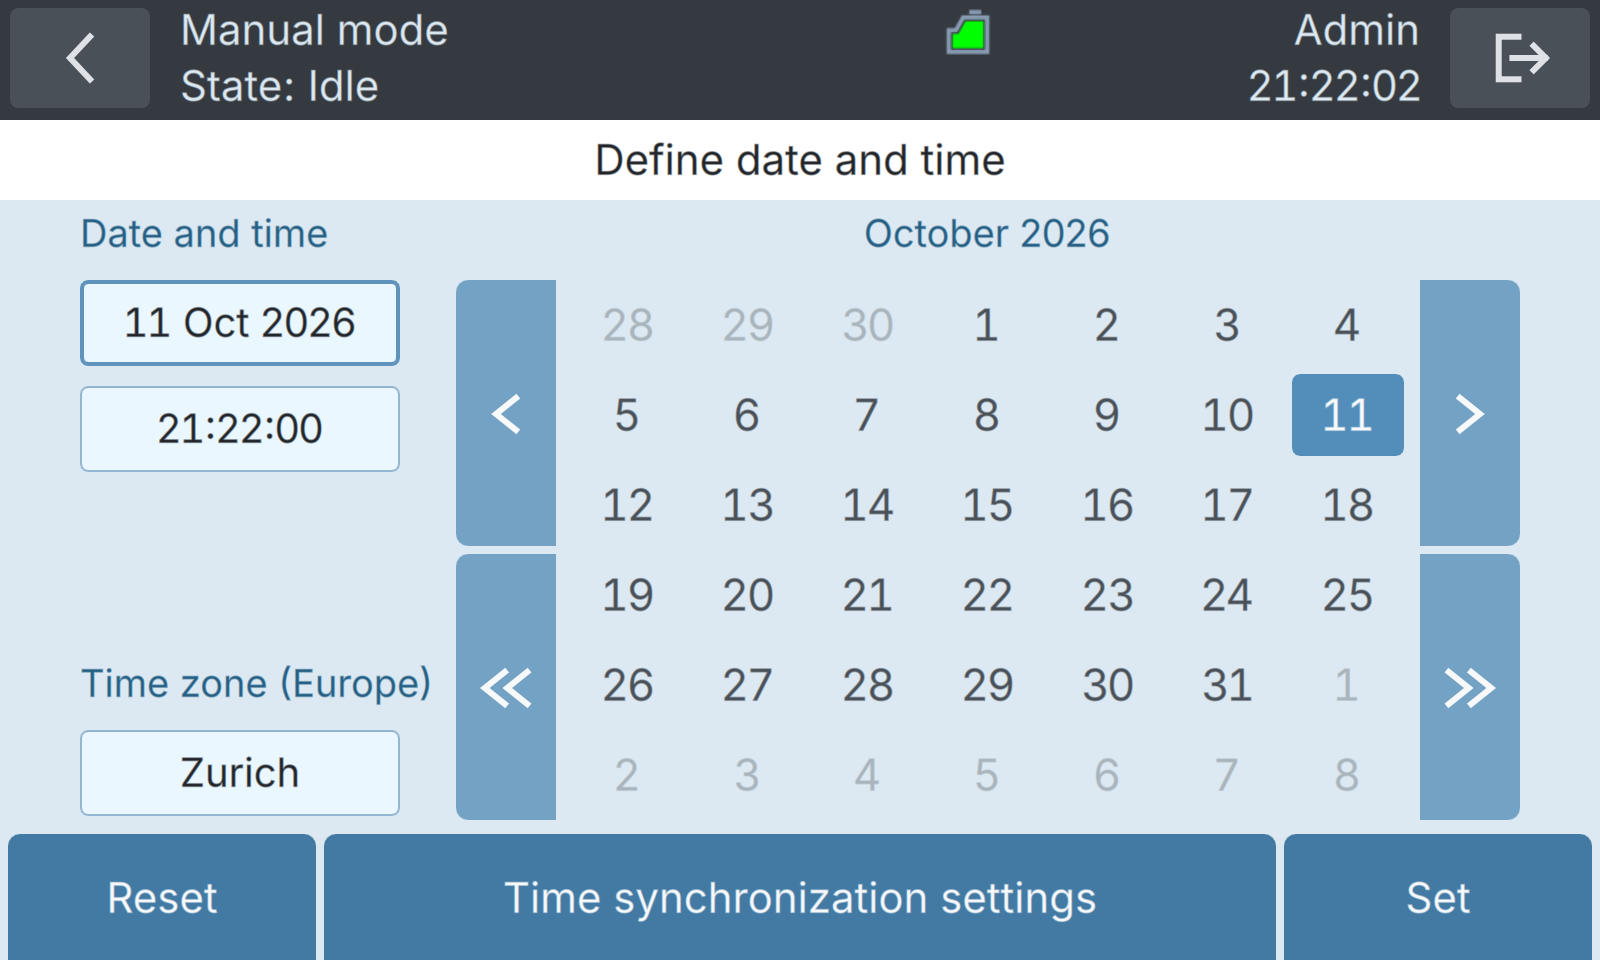
If time synchronization is enabled, either with NTP servers or through Modbus TCP, your manual date and time settings will be overridden during the next synchronization. Settings can be found under Home > Settings > System settings > Date & time > Time synchronization settings. For setting up NTP server, please refer to Set NTP Servers.
| WORK STEP | |
|---|---|
| 1. | As an Admin user, press Settings on the Home screen to open the settings menu. |
| 2. | Press the System settings button. |
| 3. | Press the Date & time button. |
| 4. | Enter the date and time. |
| 5. | Select the time zone. |
| 6. | Press the Set button. |
8.3.3 Device name
The device name can only be changed by admin users.
| WORK STEP | |
|---|---|
| 1. | As an Admin user, press Settings on the Home screen to open the settings menu. |
| 2. | Press the System settings button. |
| 3. | Press the System configuration button. |
| 4. | Tap the Device name field. |
| 5. | Enter the device name using the keyboard and press OK. |
| 6. | Press the Save button. |
8.3.4 Automatic power-on
The BactoSense has a built-in auto-restart functionality to automatically recover from temporary power interruptions. Depending on the configuration, the instrument can simply restart, but also return to operation by performing a self-cleaning process and restarting an Online mode series.
| WORK STEP | |
|---|---|
| 1. | As an Admin user, press Settings on the Home screen to open the settings menu. |
| 2. | Press the System settings button. |
| 3. | Press the System configuration button. |
| 4. | Select your automatic power-on preferences. Note: Self-cleaning only occurs if the power has been interrupted during a measurement. |
| 5. | Press the Save button. |
8.3.5 Sound notifications
You can turn on audible notifications to indicate the end of a manual measurement or maintenance process, alarm or error. The notification is one or several beeping sounds from the instrument.
| WORK STEP | |
|---|---|
| 1. | As an Admin user, press Settings on the Home screen to open the settings menu. |
| 2. | Press the System settings button. |
| 3. | Press the System configuration button. |
| 4. | Activate Sound notifications. |
| 5. | Press the Save button. |
8.4 Import / export settings
Settings are exported to a USB drive as per Export settings, diagnostics, or all to USB device. The settings are compiled to a timestamped file ending with *.bnv. In order to import the settings in a new instrument, or as a backup, it is necessary to copy the *.bnv file at the root of the USB drive, or in the directory the file was exported to. If multiple copies of the settings are located in one USB drive, the system will use the most recent one.
| WORK STEP | ADDITIONAL INFO / IMAGE | |
|---|---|---|
| 1. | As an Admin user, press Settings on the Home screen to open the settings menu. |  |
| 2. | Press the Maintenance button. |  |
| 3. | Press the Special export import button. |  |
| 4. | Connect a USB drive. If needed, press the Refresh USB list button until the drive is detected. | Make sure the *.bnv file is at the root of the USB drive. The USB drive should be formatted in FAT32, which is the common standard. |
| 5. | Press the Import settings button. | 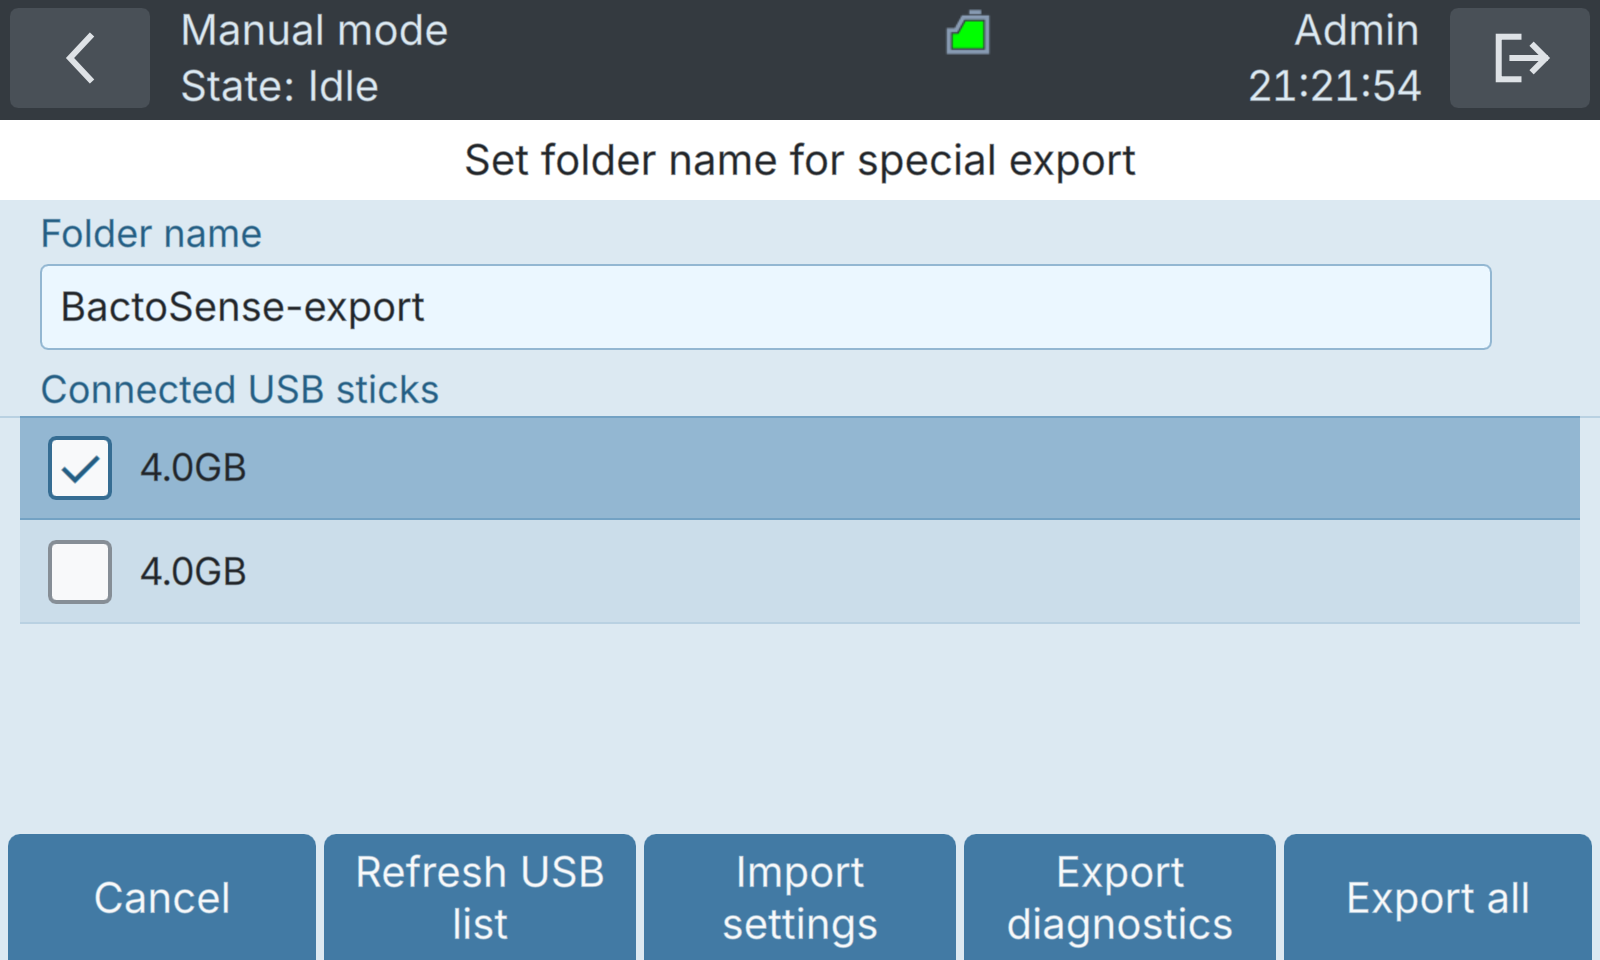 |
| 6. | Select the settings you want to import. Measurement settings include gate sets, IO settings, alarms, and date and time settings. Network settings include IP, DNS, and NTP addresses | 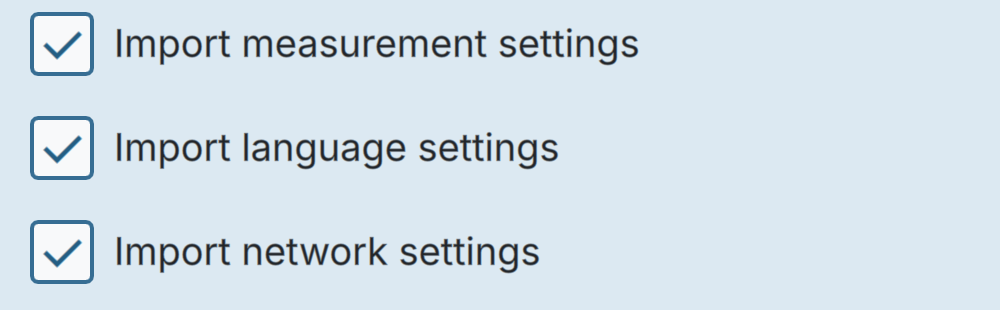 |
| 7. | Press Import settings, then Reboot now in the confirmation message, and wait until the device reboots. |
8.5 Alarm configuration
The following rules apply to alarms:
- Only Advanced and Admin users can change the alarm settings.
- Alarms are only active in the Online mode.
BactoSense records alarms in the following ways:
- A popup is displayed in the graphical user interface
- An alarm bell icon appears in the top bar if the last measurement exceeded the alarm threshold. The alarm is shown in the measurement summary when viewing a result.
- A signal can be sent out to a PLC through digital outputs (configurable).
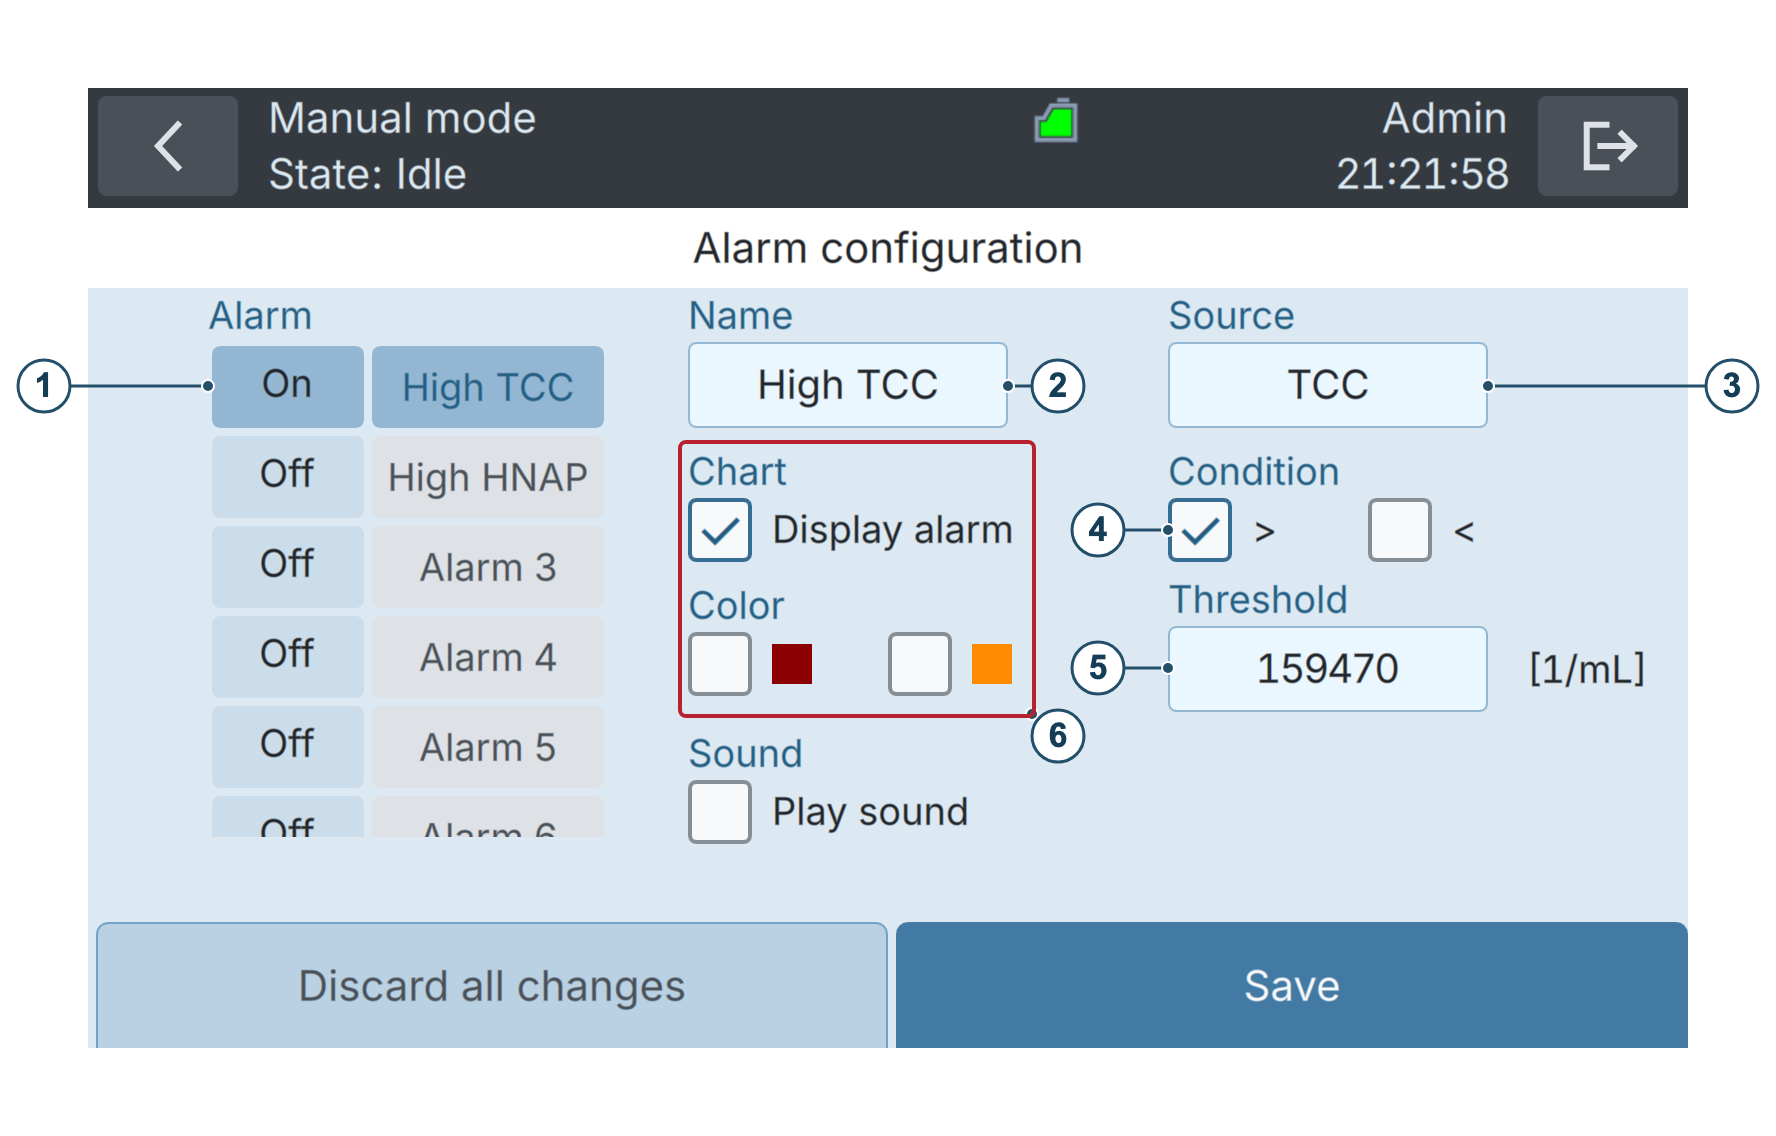
Figure 8-2 Alarm configuration in the BactoSense graphical user interface.
| 1 | Select, enable or disable alarms. Users can configure up to 9 alarms. | 2 | Name of the currently selected alarm. |
| 3 | Source of the alarm: Which measurement result should be evaluated. See figure 8-3. | 4 | Condition: Trigger the alarm when the measured parameter is larger than (>) or smaller than (<) the threshold. |
| 5 | Threshold | 6 | Display: If checked, a line will be shown on the Online mode plot, in the selected color. |
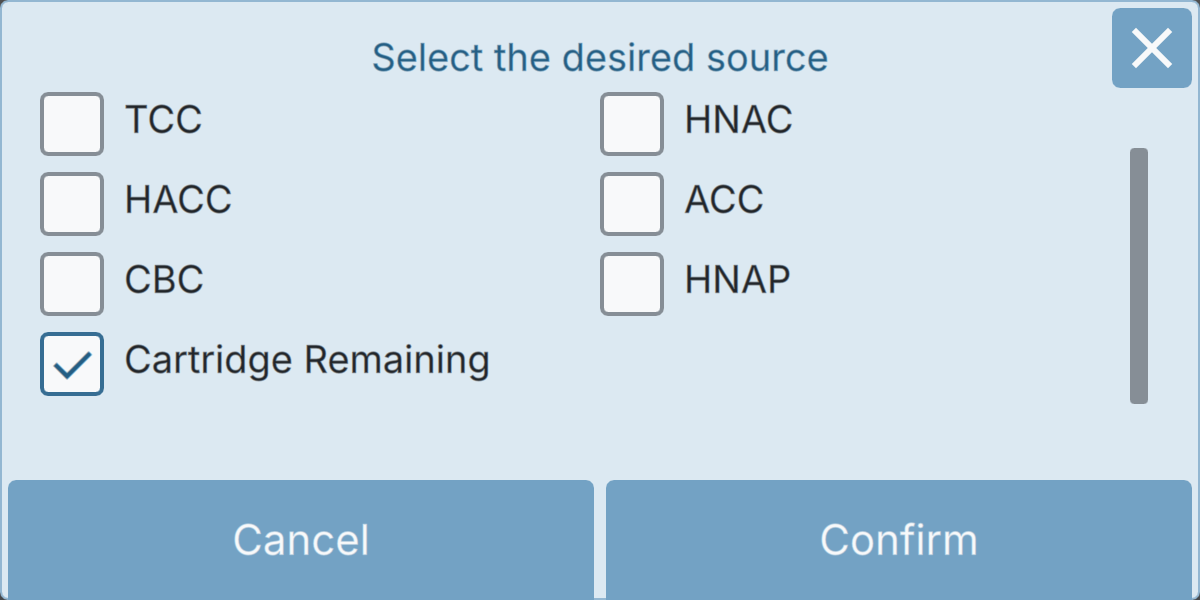
Figure 8-3 BactoSense alarm sources. For a selected source, a condition and a threshold are set. In the example above, an alarm is triggered on a certain cartridge filling level.
The following procedure describes how to configure the alarm:
| WORK STEP | ADDITIONAL INFO / IMAGES | |
|---|---|---|
| 1. | On the Home screen, press Settings to open the settings menu. | |
| 2. | Press the Online mode settings button. | |
| 3. | Press the Alarm button. | |
| 4. | Activate, select and configure the alarms (according to figure 8-2 and figure 8-3). | By default, no alarms are active. |
| 5. | Press Save to save the alarm configuration. |
8.6 Network configuration
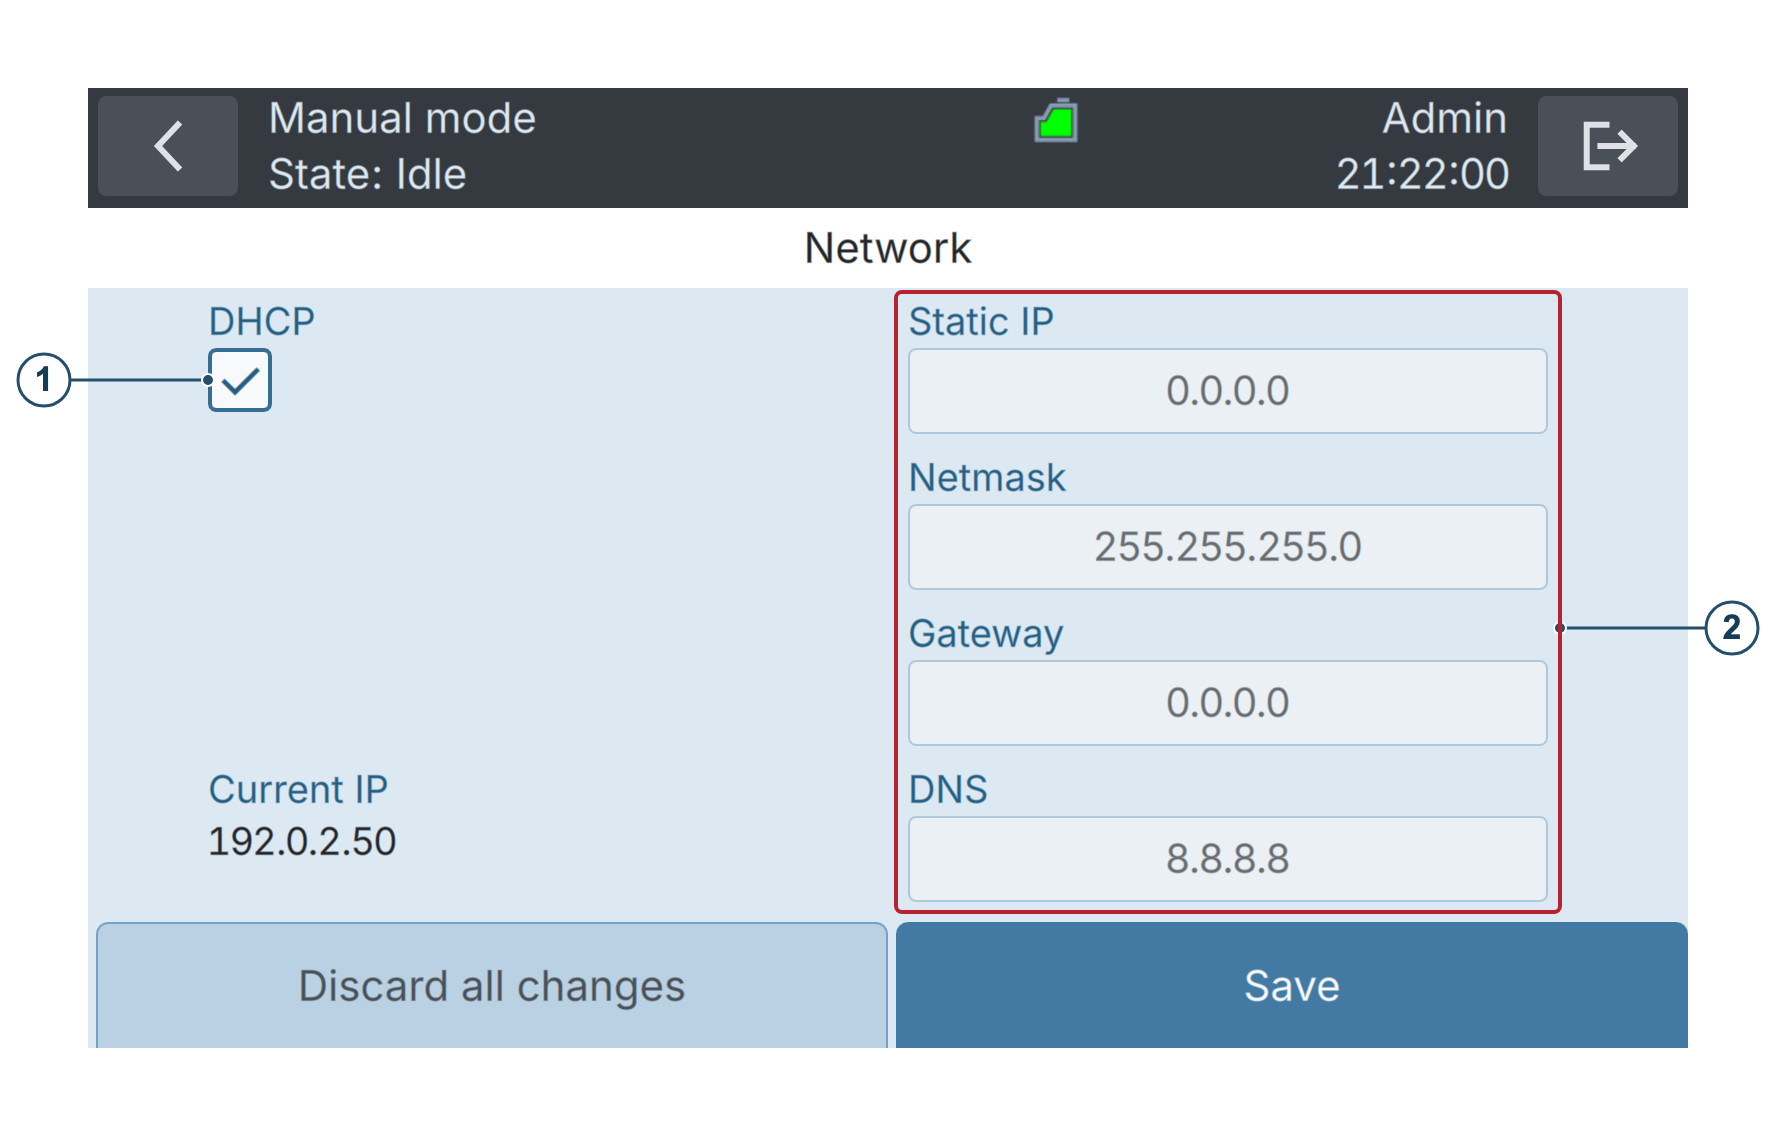
Ask your network administrator for the correct settings.
WORK STEP | ADDITIONAL INFO / IMAGE | |
|---|---|---|
1. | As an Admin user, press Settings on the Home screen to open the settings menu. |
|
2. | Press the System settings button. |
|
3. | Press the Network button. |
|
4. | A: For Dynamic IP check the DHCP check box (1). Note: This is the preferred configuration for most cases when the BactoSense is connected to a router or switch. B: For Static IP uncheck the DHCP check box (1) and enter the desired network configuration (2). Note: This is the preferred configuration when the BactoSense is directly connected to a laptop via Ethernet. Make sure to also adjust the network configuration on the laptop accordingly. |
|
5. | Press the Save button. | |
6. | Press the Reboot now button. |


8.7 Set NTP Servers
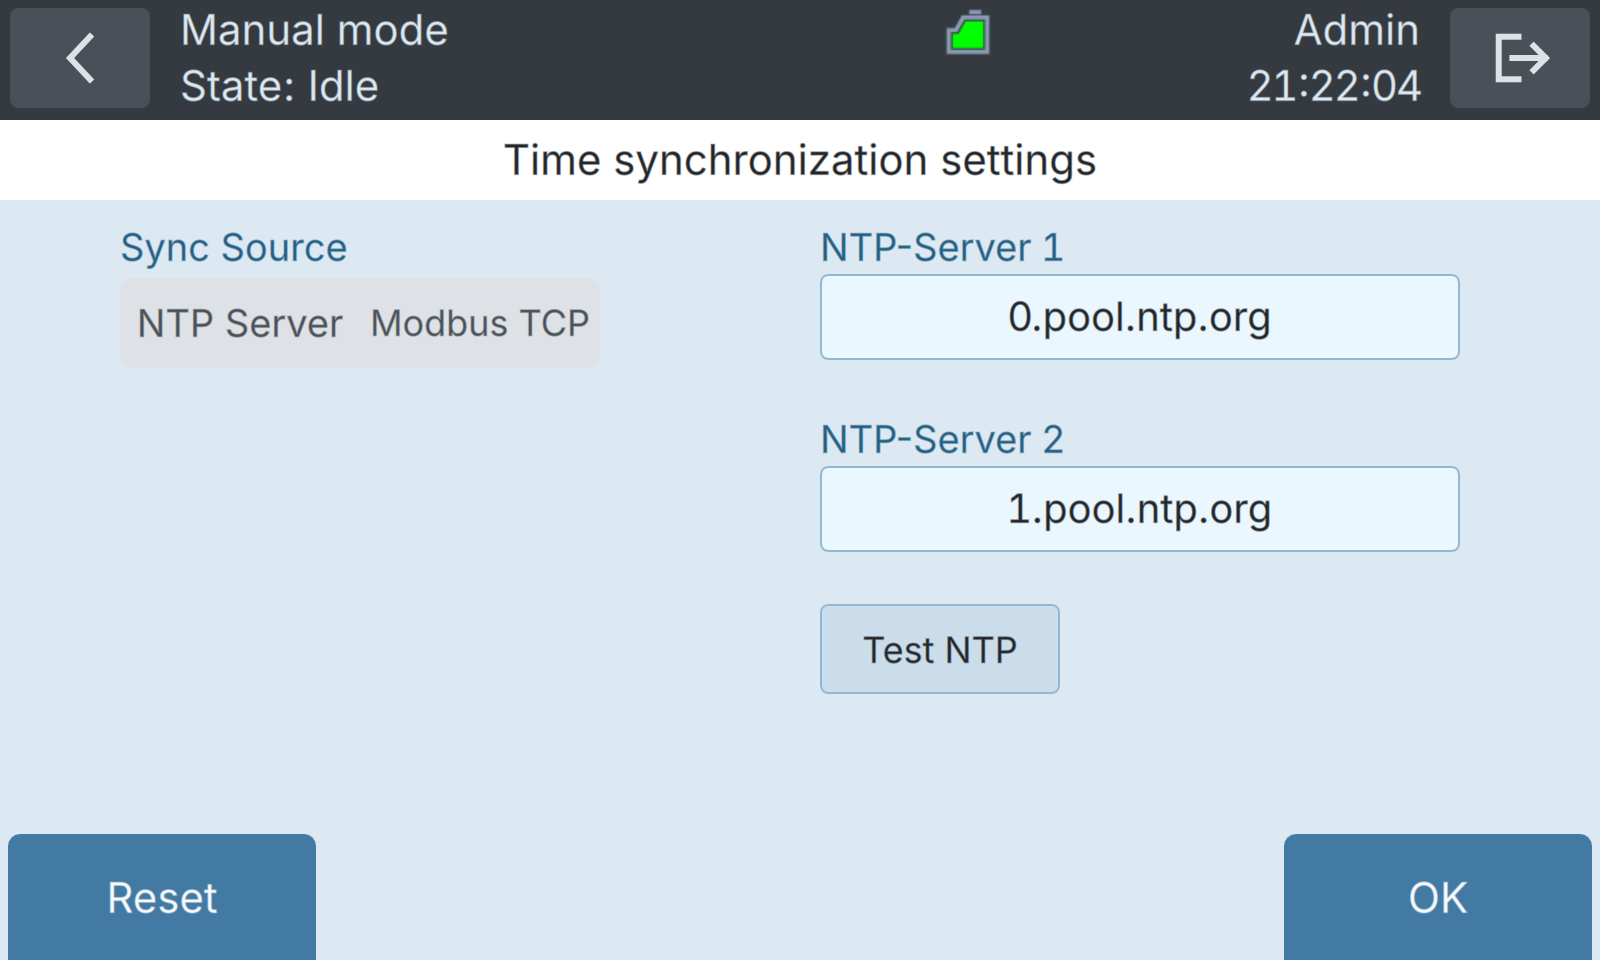
Network Time Protocol (NTP) is a computer network protocol which is used to synchronise time on computers across a network. By default, these are set to synchronise to the Network Time Foundation servers (ntp.org). You have the possibility to set custom NTP servers in the Date & time menu.
WORK STEP | ADDITIONAL INFO / IMAGE | |
|---|---|---|
1. | As an Admin user, press Settings on the Home screen to open the settings menu. |
|
2. | Press the System settings button. |
|
3. | Press the Date & time button. |
|
4. | Press the Time synchronization settings button. |
|
5. | Select the desired Sync Source. | Additional information Time synchronisation can be done via NTP server or Modbus TCP. More information about Modbus TCP can be found in Modbus TCP |
6. | Update NTP servers. |
|
7 | Press the OK button. | Additional information Press Test NTP to check whether the configured servers are reachable. Press OK to save the synchronization settings. |

8.8 The BactoSense user interface
8.8.1 General structure, Home screen and Settings menu
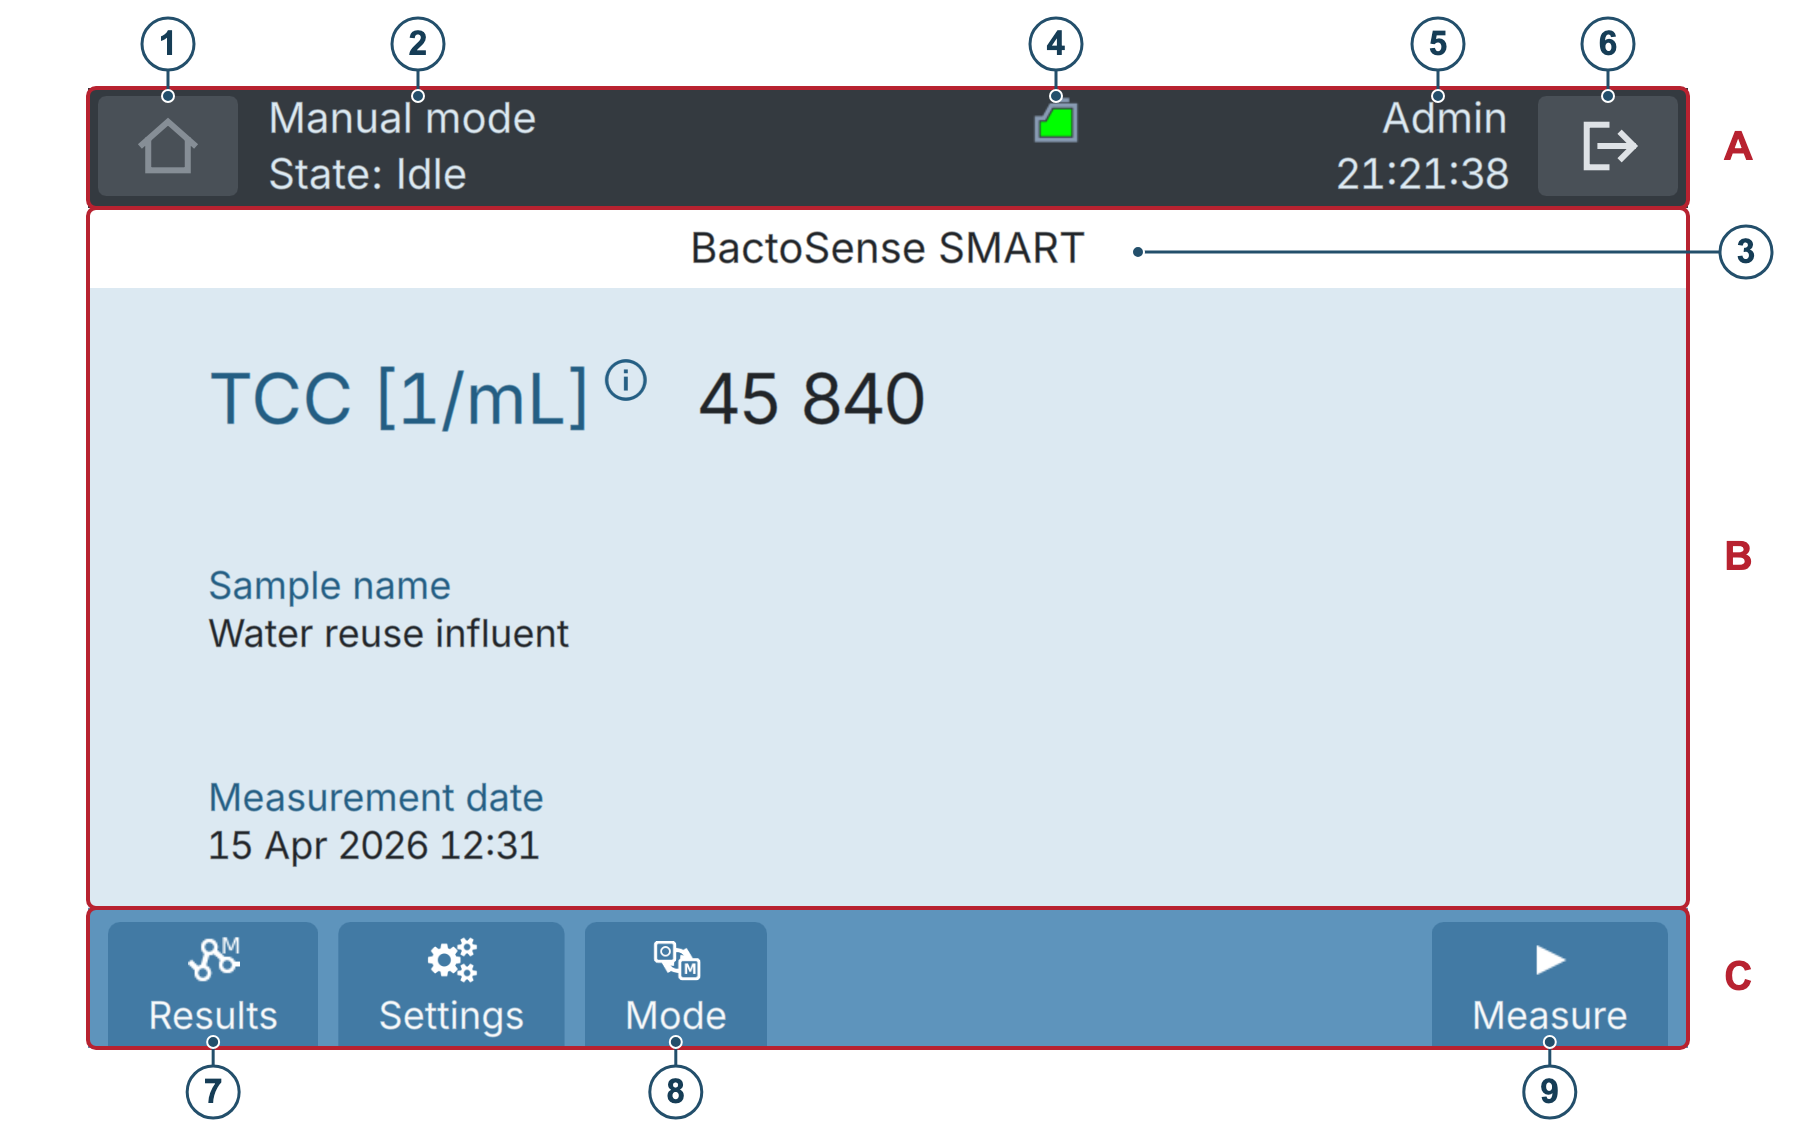
Figure 8-4 The Home screen of the BactoSense user interface.
The Home screen shows the latest measurement result. Press Settings to open the settings menu.
The BactoSense user interface is divided into 3 main sections:
| A | Top bar |
| B | Content view |
| C | Action bar |
The main elements of the user interface are:
1 | Home or return button. To | 2 | Operation mode (Manual or Online) |
3 | Current view | 4 | Top bar status icons, see Top bar status icons. |
5 | User Role | 6 | Logout or power off |
7 | Results: display the measurement results for the selected mode. | 8 | Mode: choose Online mode for continuous measurements using the online sampling device, or Manual mode for measuring grab samples using the manual sampling device. |
9 | Measure: open the measurement wizard and choose an analysis protocol (Manual mode). | ||
Depending on the user role, some options may not be visible or disabled.
8.8.2 Top bar status icons
Top bar icons are displayed in the bar in the top of the display. They indicate the status of the instrument.
Table 8-2 Top bar icons
| ICON | DESCRIPTION | ICON | DESCRIPTION |
|---|---|---|---|
 | Process running |  | Demo mode activated |
 | Cartridge almost empty |  | Service required (see Maintenance) |
 | Cartridge almost expired |  | Cartridge level indication |
 | Cartridge not correctly initialized or no cartridge |  | Cartridge empty |
 | Critical error (Critical errors) |  | Cartridge expired |
 | Alarm on last measurement (Online mode only, see Alarm configuration) |  | Non-critical error (Non-critical errors) |
8.9 Cartridge management
The BactoSense cartridges contain the reagents required for measuring and maintaining the instrument clean. Available cartridge types are TCC (Total Cell Count), ICC (Intact Cell Count), EBC (E. coli Cell Count), ACC (Active Cell Count), CBC (Coliform Cell Count), and NBC (Enterococcus Cell Count). The following sections explain cartridge handling. Cartridge storage, transportation and refill are described in Storage, Transport and Disposal.
8.9.1 General instructions for cartridge handling
When handling the cartridge, the following instructions must be followed:
Table 8-3 Cartridge handling instructions
 | Follow the procedures described in this manual. |  | Store and ship between 15 °C – 25 °C (59 °F – 77 °F). The optimal temperature is 15 °C (59 °F). |
 | Wear nitrile gloves when handling the cartridge. | 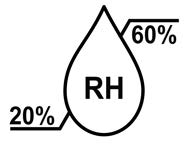 | Store and ship between 20 % and 60 % relative humidity. |
 | Wear safety glasses when handling the cartridge. |  | The cartridge is intended for refill. |
 | Ship, install and store in the indicated orientation |  | Do not throw the cartridge into the trash. |
8.9.2 Checking the filling level and expiration date of a cartridge
The cartridge filling levels and expiration date can be retrieved from several sources.
- The cartridge icon shown in the top bar of the user interface constantly indicates the approximate cartridge filling level. In case the cartridge is about to expire, the cartridge icon displays this too. Explanations of the different icons can be found in Top bar status icons.
- If you need more information, press Settings on the Home screen, then press System info. Under Cartridge capacity remaining you see how full the cartridge still is (in percent), and under Cartridge expiration date you see when the cartridge expires. The same information can also be retrieved from the web interface (see Web User Interface)
8.9.3 Cartridge overview
The BactoSense cartridge is installed in a dedicated cartridge compartment of the instrument. A door closes the cartridge compartment. The cartridge door must only be opened for removing and installing cartridges.
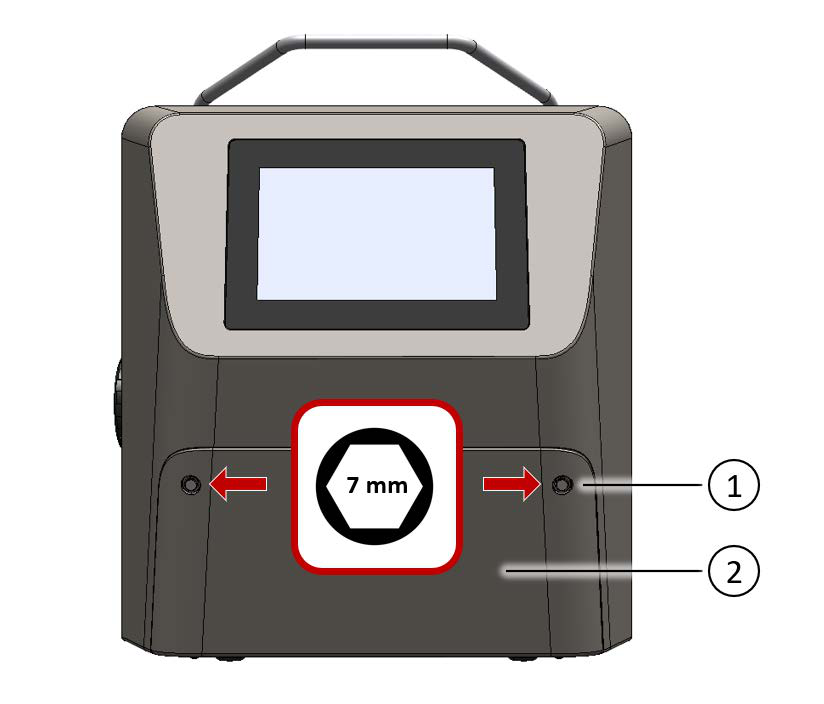
Figure 8-5 The BactoSense cartridge compartment can be opened by removing two 7 mm hex nuts using the supplied hex nut driver.
| 1 | 7 mm hex nuts to secure cartridge compartment door | 2 | Cartridge compartment door |
Open and close the cartridge compartment door only with the dedicated 7 mm hex nut driver.
After opening the cartridge compartment door, the user has access to the cartridge and the connectors which connect the cartridge to the BactoSense.
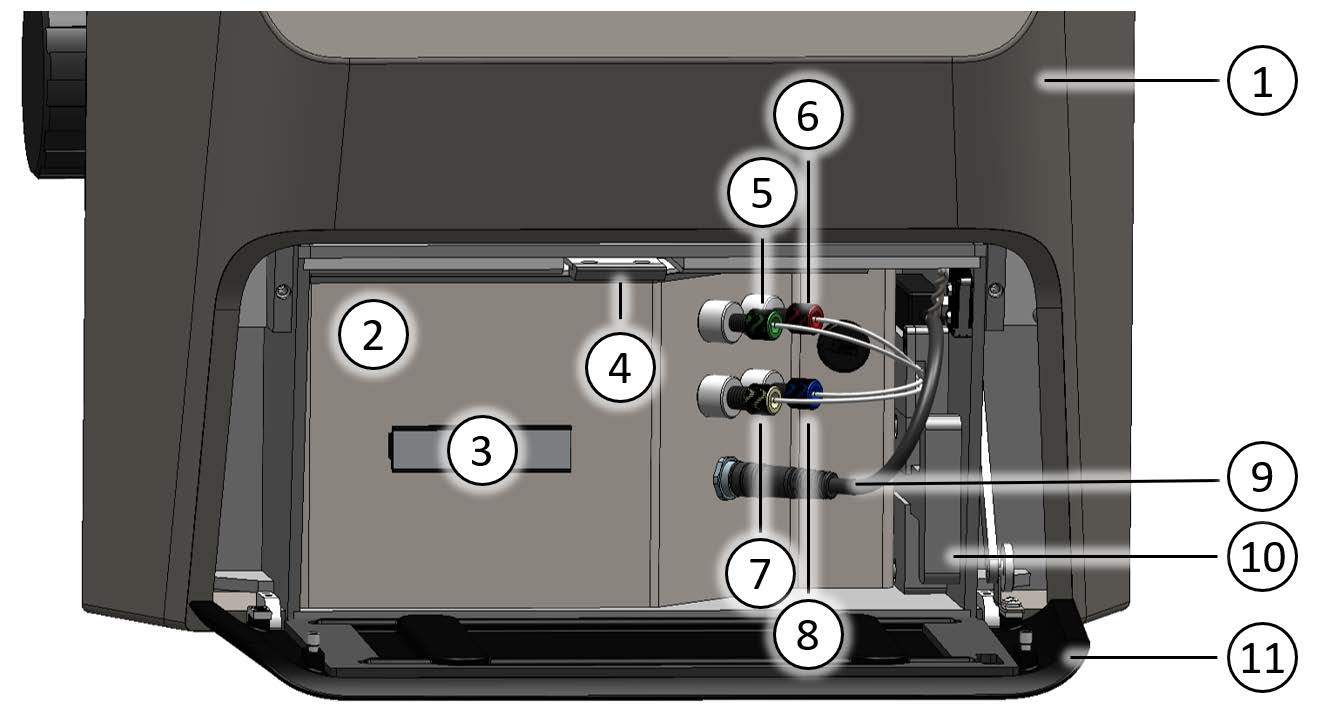
Figure 8-6 Overview of an installed cartridge. The mobility of the cartridge is secured with a fixation latch on top (4), and the cartridge is connected to the instrument with multiple fluidic (5 - 8) and one electronic connector (9). When no cartridge is inserted, the fluidic and electronic connectors can be secured using the removable connector rack (10).
1 | BactoSense instrument | 2 | Cartridge |
3 | Cartridge handle | 4 | Cartridge fixation latch |
5 | Dye connector (green) | 6 | Bleach connector (red) |
7 | Waste connector (black or beige) | 8 | Rinse connector (blue) |
9 | Electronic connector | 10 | Removable connector rack |
11 | Cartridge compartment door | ||
The BactoSense has five fluidic connectors. Depending on the cartridge type, only four or all five fluidic connectors are needed. In case of TCC or ICC cartridges, make sure the unused fifth connector is always mounted to the connector rack to prevent contamination.
8.9.4 Change cartridges
The following procedure describes the exchange of cartridges. Use this procedure if you want to remove and directly install another cartridge. If you only want to remove a cartridge and not install another one, follow the instruction in Removing a cartridge. The duration of the cartridge exchange is approximately 35 min.
Strictly follow the procedure in the on-screen wizard. Do not remove or install cartridges without this procedure.
WORK STEP | ADDITIONAL INFO / IMAGE | |
|---|---|---|
1. | Have the replacement cartridge ready and adjusted to ambient temperature. | |
2. | On the Home screen, press Settings to open the settings menu. | |
3. | Press the Maintenance button. | Basic users skip this step. |
4. | Press the Cartridge change button. | |
5. | Select Change cartridge. | |
6. | Follow the cartridge wizard Confirm to follow the instructions of the on- screen wizard. Only open the cartridge compartment door when instructed. Adhere to the general cartridge handling instruction in General instructions for cartridge handling. Wear nitrile gloves and safety glasses. Tightly seal the fluidic connectors of the old cartridge with the attached plugs before removing it. Make sure the cartridge compartment door is tightly closed and secured at the end. | Skipping the cartridge wizard Only very experienced users mastering safe cartridge operations are allowed to skip the on-screen instructions. In case of TCC or ICC cartridges, make sure the unused fifth connector is always mounted to the connector rack to prevent contamination. |
7. | Handling the removed cartridge • If you wish to store the removed cartridge, refer to the storage instructions in Storage of the cartridge. • If you wish to refill the removed cartridge, refer to the refill instructions in Returning a cartridge for refill. |
8.9.5 Removing a cartridge
This procedure is intended for the removal of a cartridge, without immediate installation of another cartridge. If you want to exchange cartridges, follow the procedure described in Change cartridges. The duration of the cartridge removal is approximately 5 min.
Strictly follow the procedure in the on-screen wizard. Do not remove or install cartridges without this procedure.
WORK STEP | ADDITIONAL INFO / IMAGE | |
|---|---|---|
1. | On the Home screen, press Settings to open the settings menu. | |
2. | Press the Maintenance button. | Basic users skip this step. |
3. | Press the Cartridge change button. | |
4. | Select Remove cartridge. | |
5. | Follow the cartridge wizard Confirm to follow the instructions of the on- screen wizard. Only open the cartridge compartment door when instructed. Adhere to the general cartridge handling instruction in General instructions for cartridge handling. Wear nitrile gloves and safety glasses. Tightly seal the fluidic connectors of the old cartridge with the attached plugs before removing it. Make sure the cartridge compartment door is tightly closed and secured at the end. | Skipping the cartridge wizard Only very experienced users mastering safe cartridge operations are allowed to skip the on-screen instructions. |
6. | Handling of the removed cartridge • If you wish to store the removed cartridge, refer to the storage instructions in Storage of the cartridge. • If you wish to refill the removed cartridge, refer to the refill instructions in Returning a cartridge for refill. | The top bar of the user interface indicates that no cartridge is connected. In the Settings menu, Maintenance is highlighted; Basic users see the highlighted Cartridge change button directly. |
8.9.6 Installing a cartridge
This procedure is intended for the installation of a cartridge, when no other cartridge is installed in the BactoSense. If there is already a cartridge and you want to exchange cartridges, follow the procedure described in Change cartridges. The duration of the cartridge installation is approximately 30 min.
Strictly follow the procedure of the on-screen wizard. Do not remove or install cartridges without this procedure.
WORK STEP | ADDITIONAL INFO / IMAGE | |
|---|---|---|
1. | Have the new cartridge ready and adjusted to ambient temperature. | |
2. | On the Home screen, press Settings to open the settings menu. | |
3. | Press the Maintenance button. | The Maintenance button is highlighted in orange in case no cartridge is installed. Basic users skip this step. |
4. | Press the Cartridge change button. | |
5. | Select Install cartridge. | |
6. | Follow the cartridge wizard Confirm to follow the instructions of the on- screen wizard. Only open the cartridge compartment door when instructed. Adhere to the general cartridge handling instruction in General instructions for cartridge handling. Wear nitrile gloves and safety glasses. Make sure the cartridge compartment door is tightly closed and secured at the end. | Skipping the cartridge wizard Only very experienced users mastering safe cartridge operations are allowed to skip the on-screen instructions. In case of TCC or ICC cartridges, make sure the unused fifth connector is always mounted to the connector rack to prevent contamination. |
7. | After following through all steps of the on- screen wizard, the new cartridge is properly initialized. | The cartridge status is indicated with a cartridge symbol in the top bar of the user interface, see Top bar status icons. |
8.10 Switching between sampling devices
The BactoSense can be operated with either the manual or the online sampling device. The following procedure describes the exchange of sampling devices. Sampling device storage information can be found in Storage of the sampling devices.
| WORK STEP | ADDITIONAL INFO / IMAGES | |
|---|---|---|
| 1. | Remove the mounted sampling device according to the instructions in Removal of the online sampling device (online sampling device) or Removal of the manual sampling device (manual sampling device) | |
| 2. | Install the new sampling device according to the instructions in Installation of the online sampling device (online sampling device) or Installation of the manual sampling device (manual sampling device). |
8.10.1 Removal of the online sampling device
When switching to the manual sampling device, the online sampling device has to be removed. Follow the procedure below to safely remove the device and prepare it for storage.
Avoid contamination of the equipment. Wear nitrile gloves when handling samples, sampling devices and any components which come in contact with them.
| WORK STEP | |
|---|---|
| 1. | Terminate any ongoing measurement series, as described in Terminating automatic online measurements. |
| 2. | Stop the water flow through the sampling device tubings and sampling device. |
| 3. | Carefully unscrew the knurled sampling device fixation ring until the sampling device can be removed. |
| 4. | Remove the online sampling device. Make sure the white sealing plug still sits tightly in the connector of the sampling device. If not, it may have remained in the BactoSense sampling device connector. In this case carefully remove it with tweezers and place it back in the sampling device. |
| 5. | Disconnect and drain the inlet and outlet tubings from the water source and the sampling device body. |
| 6. | Inspect the inlet and outlet tubings for contamination and damage. Only reuse clean and intact tubings. |
| 7. | If you want to store the sampling device, place the device and the tubings separately in a clean and dry plastic bags and follow the storage instructions in Storage of the sampling devices. |
| 8. | To mount now the manual sampling device, see Installation of the manual sampling device. |
8.10.2 Removal of the manual sampling device
When switching to the online sampling device, the manual sampling device has to be removed. Follow the procedure below to safely remove the device and prepare it for storage.
Avoid contamination of the equipment. Wear nitrile gloves when handling samples, sampling devices and any components which come in contact with them.
| WORK STEP | |
|---|---|
| 1. | Perform a cleaning of the manual sampling device: If a Washstation is available, follow the procedure in Clean manual sampling device with Washstation, otherwise the procedure in Clean manual sampling device with basic cleaning. |
| 2. | After finishing, attach a clean and empty 5 mL screw-cap tube or the Washstation to the sampling device. |
| 3. | Carefully unscrew the knurled sampling device fixation ring on top of the device until the sampling device can be removed. |
| 4. | Remove the manual sampling device. Make sure the white sealing plug still sits tightly in the connector of the sampling device. If not, it may have remained in the BactoSense sampling device connector. In this case, carefully remove it with tweezers and place it back in the sampling device. |
| 5. | If you want to store the sampling device, place it in a clean and dry plastic bag and follow the storage instructions in Storage of the sampling devices. |
| 6. | To mount now the online sampling device, follow the procedure in Installation of the online sampling device. |
8.11 Qualification
Qualification is a process to ensure the BactoSense operates as intended. Different options are available.
To do a fully automated quick check of the instrument status, perform the self-check procedure described in Automatic self-check. This test does not require any reagents or user interaction, is very quick and checks the integrity and communication between the different modules of the BactoSense.
To assess the cleanliness of the BactoSense and rule out a contamination, perform the cleanliness verification procedure in Cleanliness verification.
For operational environments requiring system suitability testing, use the System Suitability Test Kit (SST Kit) and follow the procedure in its user manual.
For other environments, an instrument qualification using the Validation kit is recommended in the following situations:
- After shipping the instrument or other long-distance transport, exposing the instrument to vibration or shock.
- After storing the instrument for more than one month.
- If there are indications that measurement results could be erroneous.
8.11.1 Cleanliness verification
| WORK STEP | |
|---|---|
| 1. | Make sure the manual sampling device is tightly installed as described in Installation of the manual sampling device. |
| 2. | Perform a cleaning of the sampling device with two replications: If a Washstation is available, follow the procedure in Clean manual sampling device with Washstation, otherwise the procedure in Clean manual sampling device with basic cleaning. |
| 3. | Prepare the blank sample in a 5 mL screw-cap tube. There are two options: A) Use cell-free water, e.g. a sterile solution aliquot from the Validation Kit. If you use the sterile solution aliquot from the Validation Kit, remove the cap of the aliquot and place the aliquot in an empty 5 mL screw-cap tube, as described in the user manual of the Validation Kit. B) Take a still mineral water and filter twice using a membrane filter with a pore size of 0.22 µm or smaller. |
| 4. | Navigate to the Home screen of the BactoSense user interface. |
| 5. | On the Home screen, press Mode and select Manual mode. Press Back, then Measure to open the measurement wizard. |
| 6. | Select Prime from the list of available protocols. |
| 7. | Press the Next button. |
| 8. | Remove the tube or Washstation from the manual sampling device and attach the blank sample. |
| 9. | Press the Start button to run the Prime protocol. |
| 10. | After completion of the Prime, press the New button to navigate back to the list of protocols. |
| 11. | Select Water Analysis from the list of available protocols. |
| 12. | Configure two replications. |
| 13. | Enter a sample name by tapping into the Sample name text field, entering the name and pressing OK. |
| 14. | Verify that the ICC or TCC default gate is configured and change it otherwise by pressing into the Gates field. |
| 15. | Press the Next button. |
| 16. | Press the Start button and wait for the two measurements to complete. |
| 17. | After finishing, press the Next button to review the results. |
| 18. | Look at the results and compare them to the reference values indicated below. The BactoSense is clean if the following criteria are fulfilled: • For TCC cartridges: TCC [/mL] < 300 • For ICC cartridges: ICC [/mL] < 100 |
| 19. | If the cell concentrations are higher than the specified limits, apply the following procedure: • Repeat the procedure with a freshly prepared blank sample. • Repeat the procedure after a decontamination using the Cleaning Kit (see Consumables). • If the test keeps failing, contact bNovate support or your local service representative. |
| 20. | After finishing, attach a clean and empty 5 mL screw-cap tube or the Washstation to the manual sampling device. |
8.12 Demo mode
Demo mode can be used when demonstrating the device or when learning how to navigate the menus and use the functions. When it is activated, the instrument reboots into a special mode that displays demonstration data (the owner’s measurement results are hidden). All the instrument’s functions are replaced by simulations that never move the hardware or modify the results database. This means protocols can be started without needing to load a sample, and users can pretend to delete or re-gate results without ever changing the data. If the demo mode is activated, the message Demo is displayed in the upper middle of the screen. When the instrument is reverted to normal mode, the owner’s data is shown again, and all functions are active again.
WORK STEP | ADDITIONAL INFO / IMAGE | ||
|---|---|---|---|
1. | As an Admin user, press Settings on the Home screen to open the settings menu. |
| |
2. | Press the System settings button. Press the Demo mode button. |
|
|
3. | Select the Activate demo mode checkbox. | ||
4. | Press the Save and restart button. | ||
5. | The device reboots automatically. | ||

To return into normal mode, follow the same procedure, but uncheck the Activate demo mode box.
8.13 Factory reset
Factory reset reverts most of the instrument settings to the factory values: Gating limits, measurement interval, default protocol names, users, language and network settings. This option is accessible only by the Admin and Service users.
The following procedure describes how to perform a factory reset:
WORK STEP | ADDITIONAL INFO / IMAGE | ||
|---|---|---|---|
1. | As an Admin user, press Settings on the Home screen to open the settings menu. |
| |
2. | Press the Maintenance button, then the Factory reset button. |
|
|
3. | Use the check boxes to select which parameters you wish to reset: • Instrument settings • Measurements incl. errors and logs • both | Additional information Service logs, validation results and the software update his- tory are not deleted. | |
4. | Press Reset the device and reboot, then confirm with Yes. | ||
