10. Measurements
10.1 Samples
The BactoSense can measure manually collected grab samples using the manual sampling device, and also sample automatically from a connected water source using the online sampling device.
Sample types and pretreatments:
- Raw waters and especially surface waters must be filtered with a 20 µm filter. Particles can block the internal filters and damage the instrument. Clear water expected to be potable usually does not need filtering.
- Sparkling water and soft drinks cannot be measured by the instrument.
- Water with a high concentration of chlorine can affect the results of the measurement.
- The sample and operating conditions listed in Technical data must be fulfilled.
10.2 Measuring automatically in Online mode
Measuring in Online mode describes a configuration, in which the BactoSense is connected to a water source using the online sampling device, and automatically draws and measures a sample at predefined intervals.
If you want to measure manually collected grab samples instead, refer to Measuring in manual mode.
For different intervals or selected weekdays, see Advanced scheduling.
10.2.1 Configuring and starting automatic online measurements
The following instructions show how to configure and start automatic online measurements using the online sampling device.
| WORK STEP | ADDITIONAL INFO / IMAGES | |
|---|---|---|
| 1. | Make sure the online sampling device is tightly installed as described in Installation of the online sampling device. | If you have the manual sampling device installed and want to change to the online sampling device, refer to Removal of the manual sampling device to remove the manual sampling device and Installation of the online sampling device to install the online sampling device. |
| 2. | Navigate to the Home screen of the BactoSense user interface. | |
| 3. | On the Home screen, press Mode and select Online mode. Press Back to return to the Home screen. | |
| 4. | Press Start on the Home screen to open the online measurement wizard. | |
| 5. | Under Protocol, make sure the checkbox for “Online Sampling Device (with Backflush)” is checked. | |
| 6. | Enter a sample name by tapping into the Sample name text field. | |
| 7. | Select the desired gate to be applied to the measurements by tapping into the Gates text field. | Generally, default TCC and ICC gates are used. Use user-defined gates if your application requires it. Creating and adjusting gates is described in Results and Data Analysis. |
| 8. | Press the Next button. | |
| 9. | If the weekly schedule editor is displayed, press Back to return to the simple interval schedule. Select the measurement interval using the wheel on the right hand side. | The measurement interval describes the time between different measurements and can be as short as 30 min and as long as 6 hours. |
| 10. | If needed, delay the starting time by unchecking Start immediately and choosing a specific start time. | The time setting of the BactoSense is described in Date and time. |
| 11. | Press the Start button. | During the measurement, the current estimate of the cell concentration is displayed in the action bar under “Last”. |
| 12. | After each measurement, the time series graph is updated. | For more details press the View results button. |
| 13. | If you want to stop an online measurement series, refer to Terminating automatic online measurements. |
10.2.2 Terminating automatic online measurements
Follow the steps below to terminate a measurement series in Online mode.
| WORK STEP | ADDITIONAL INFO / IMAGES | |
|---|---|---|
| 1. | In Online mode, tap the plot on the Home screen to open the online chart. Press Stop. | |
| 2. | Confirm the message to stop the Online mode measurement series. | |
| 3. | If a measurement is running, you can select whether you want to abort it immediately, or wait for completion. | |
| 4. | If you don’t continue with another measurement series within the next hours, proceed with removing the online sampling device as described in Removal of the online sampling device and installing the manual sampling device as described in Installation of the manual sampling device. | |
| 5. | If you want to view your data, refer to Reviewing automatic online measurements. If you want to retrieve your data, refer to Data Access and Export. |
10.2.3 Reviewing automatic online measurements
In Online mode, tap the plot on the Home screen to open the line plot of the measurement results over time.
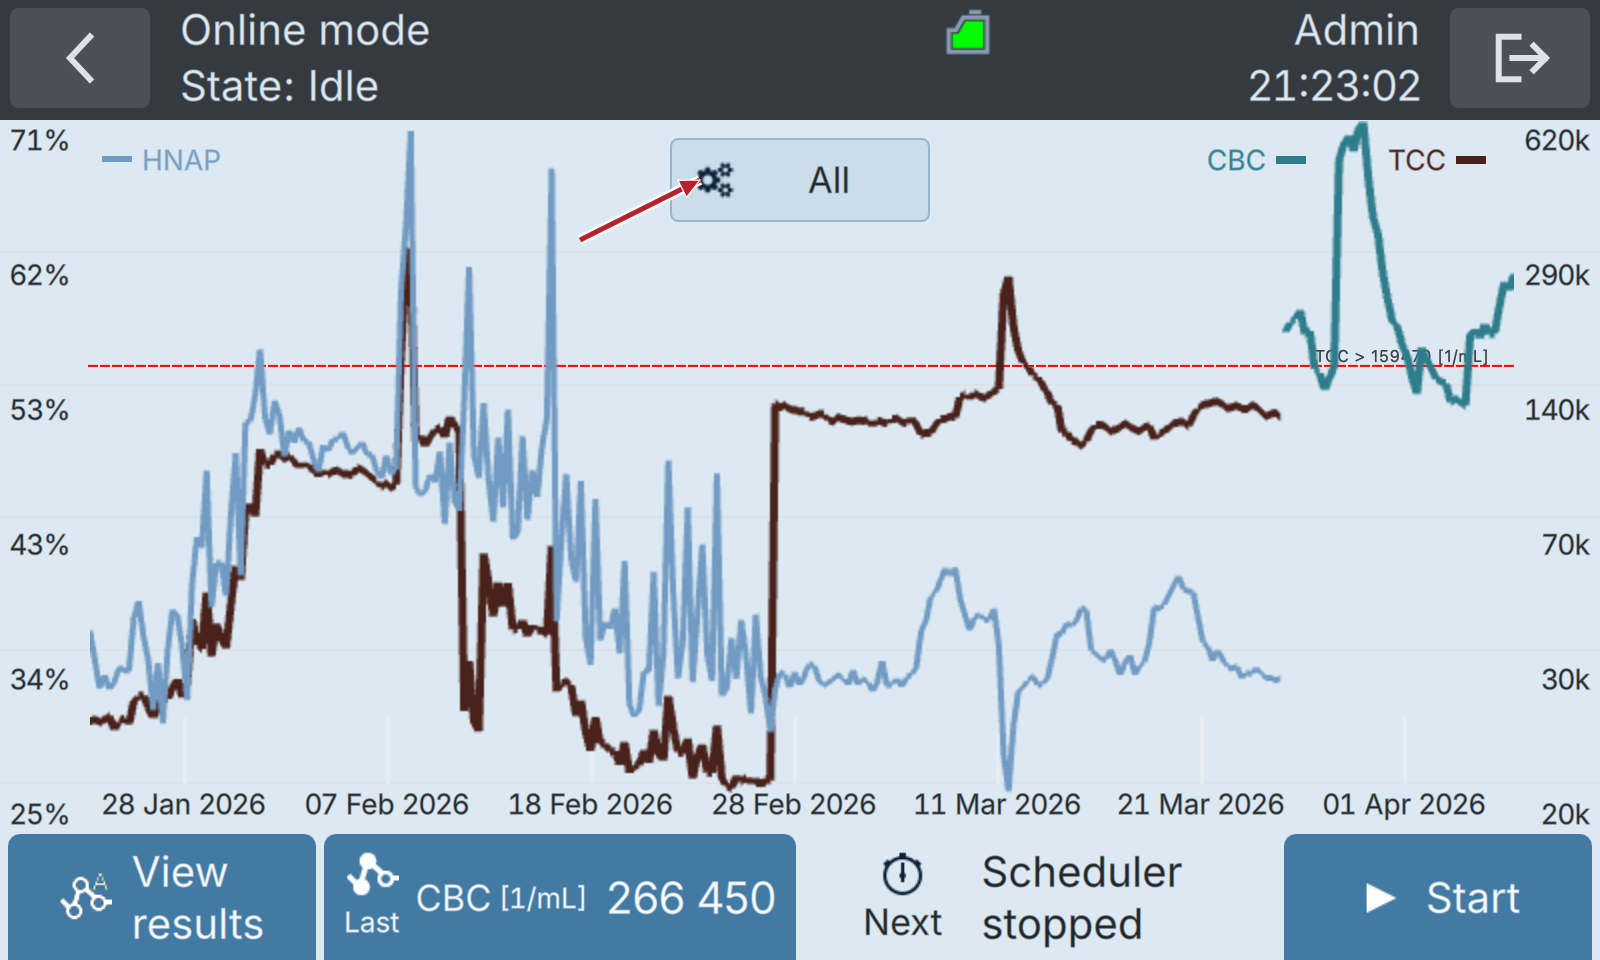
Figure 10-1 Online mode results overview plot
By tapping the button with a gear icon (arrow in figure 10-1), users can change the scales and which metrics are displayed (see figure 10-2). To display alarms on the plot, create an alarm and enable its "Display alarm" setting (see Alarm configuration).
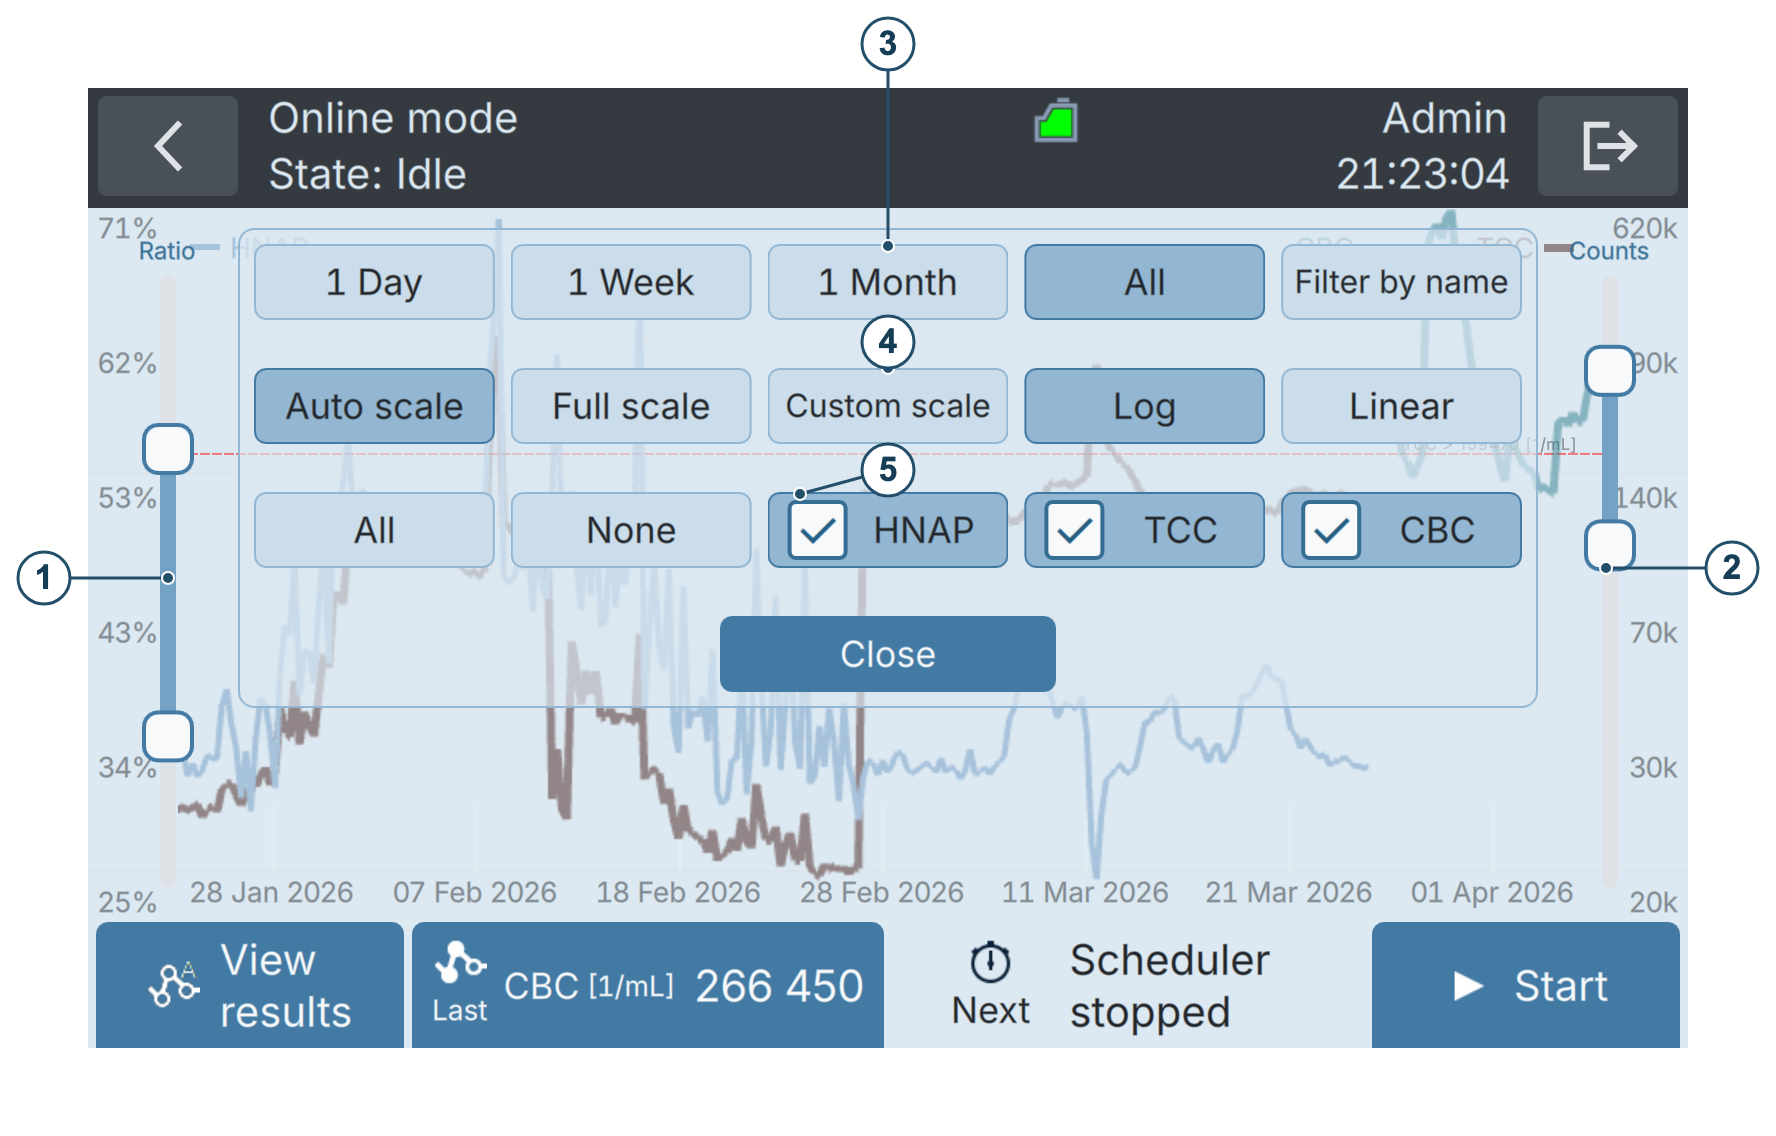
Figure 10-2 Online mode plot settings
| 1 | Adjust the percentage scale. Touch the upper half of the scale bar to move the upper limit. Touch the lower half to move the lower limit. |
| 2 | Adjust the counts scale. Touch the upper half of the scale bar to move the upper limit. Touch the lower half to move the lower limit. |
| 3 | Choose the display interval or filter by name (see Filtering measurements). |
| 4 | Choose the vertical scale: • Auto scale adapts to the current data • Full scale shows the full range of the instrument • Custom scale is adjusted with sliders 1 and 2. Log and Linear control the counts scale (right-hand-side scale). |
| 5 | Choose which metrics to display on the graph. |
10.2.4 Advanced scheduling
Use advanced scheduling when measurements must run at different intervals or on selected weekdays. A weekly schedule combines one or more rules, each with its own protocol, measurement name, gates and timing. The same weekly plan repeats until you change or stop it.
Advanced scheduling requires an activated Management Package or Scientific Package. If Advanced is unavailable, check the package status under Settings → System settings → Upgrades; see Upgrade Packages. Before starting, install the online sampling device and check the instrument's date and time.
Create a weekly schedule
| WORK STEP | ADDITIONAL INFO / IMAGES | |
|---|---|---|
| 1. | Follow steps 1–8 of Configuring and starting automatic online measurements to choose Online mode, the protocol, sample name and gates. | Press Next to reach the scheduling screen. |
| 2. | Press Advanced. If a weekly schedule is already configured, the rule editor may open directly. | Figure 10-3 shows the Advanced control on the simple interval screen.  |
| 3. | Select a rule in the left-hand list to edit it, or press New rule to add one. Select an unwanted rule and press Delete to remove it from the draft. | Review the existing rules before adding another; all rules contribute to the weekly schedule.  |
| 4. | Set Name, Protocol and Gate for the selected rule. | Name labels the resulting measurements. Choose gates compatible with the installed cartridge. Maintenance protocols that do not need gates hide this field. |
| 5. | Choose 30 minutes, 1 hour, 2 hours, Daily or Custom. | The interval presets repeat every day. Daily schedules one run per day at the chosen Start time. Use Custom to select weekdays, another interval or a time window. |
| 6. | For Custom, set Start time, select the required Days and set Interval in minutes. Press Set time range to choose the daily window, then confirm with OK. | Scroll the fields below the frequency buttons to see Interval, Set time range and Range. Figures 10-4 and 10-5 show the same rule before and after scrolling.  |
| 7. | Repeat steps 3–6 for any additional rules. Press Preview. | Select a gate if Preview is unavailable because one is missing. If preview reports a conflict, return to the rules and adjust their times or intervals so protocols have time to finish.  |
| 8. | Select each weekday in the preview and check the generated entries. Select an entry to inspect its Time, Name, Protocol and Gate. | The preview can include automatically inserted cleaning protocols during long gaps. Review these alongside measurement entries; see Figure 10-6.  |
| 9. | Make any individual changes described below, then press Save to apply the weekly schedule. | Changes to rules and preview entries remain a draft until you press Save.  |
| 10. | At Start scheduler now?, press Yes to start the saved plan, or No to save it without starting a stopped scheduler. | Check the Home screen to confirm the operating state. To stop an active series, follow Terminating automatic online measurements. |
Figure 10-3 Open Advanced scheduling from the simple interval screen
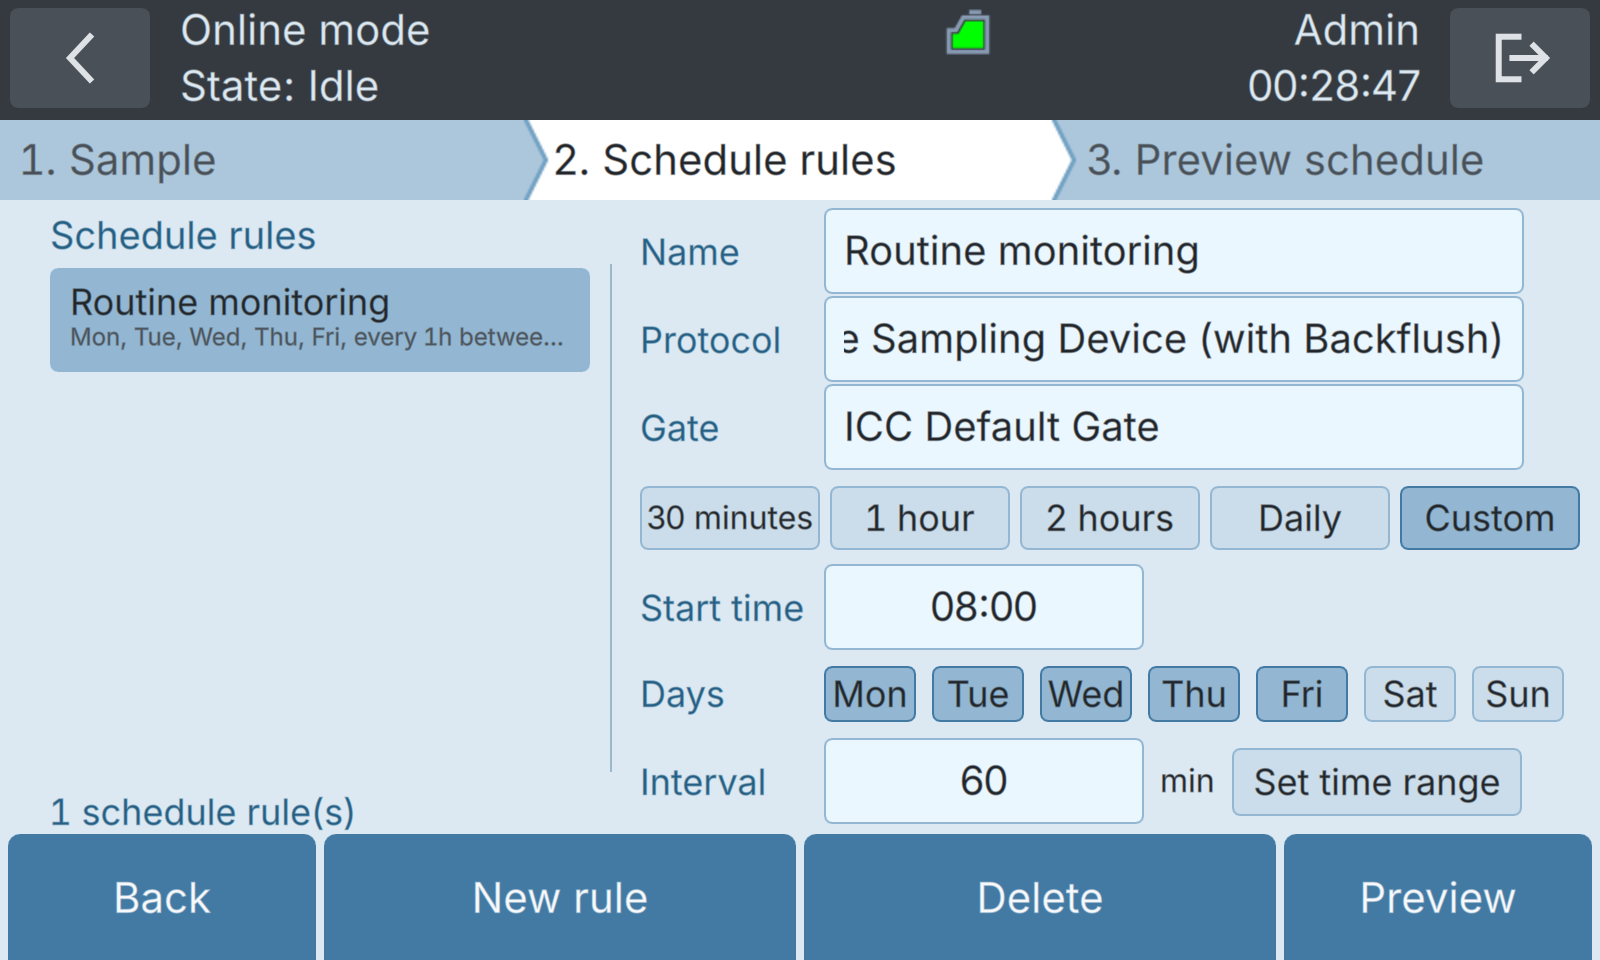
Figure 10-4 Rule editor with measurement settings, frequency and weekdays
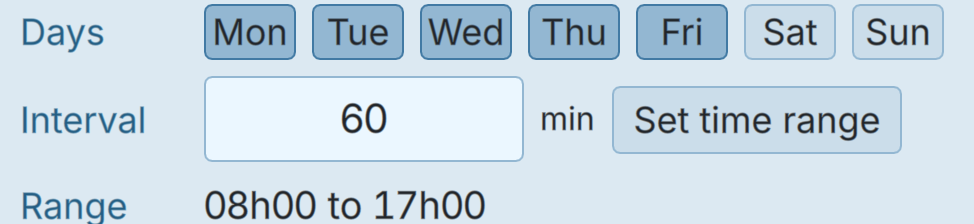
Figure 10-5 Scroll the custom fields to check the interval and time range
Example: hourly monitoring on weekdays. Set Custom, Start time to 08:00, Days to Monday–Friday, Interval to 60 min and the time range to 08:00–17:00. The measurement entries start at 08:00, 09:00, …, 16:00 on those days. The range ends at 17:00; it does not add a 17:00 start. These values illustrate the controls; choose a plan appropriate for your application.
For a window that crosses midnight, use separate rules for the parts before and after midnight and select the corresponding weekdays. Check the generated preview against the intended times.
Adjust individual entries in the preview
Use the preview to make an exception to the generated plan, such as moving one run or changing its measurement name.
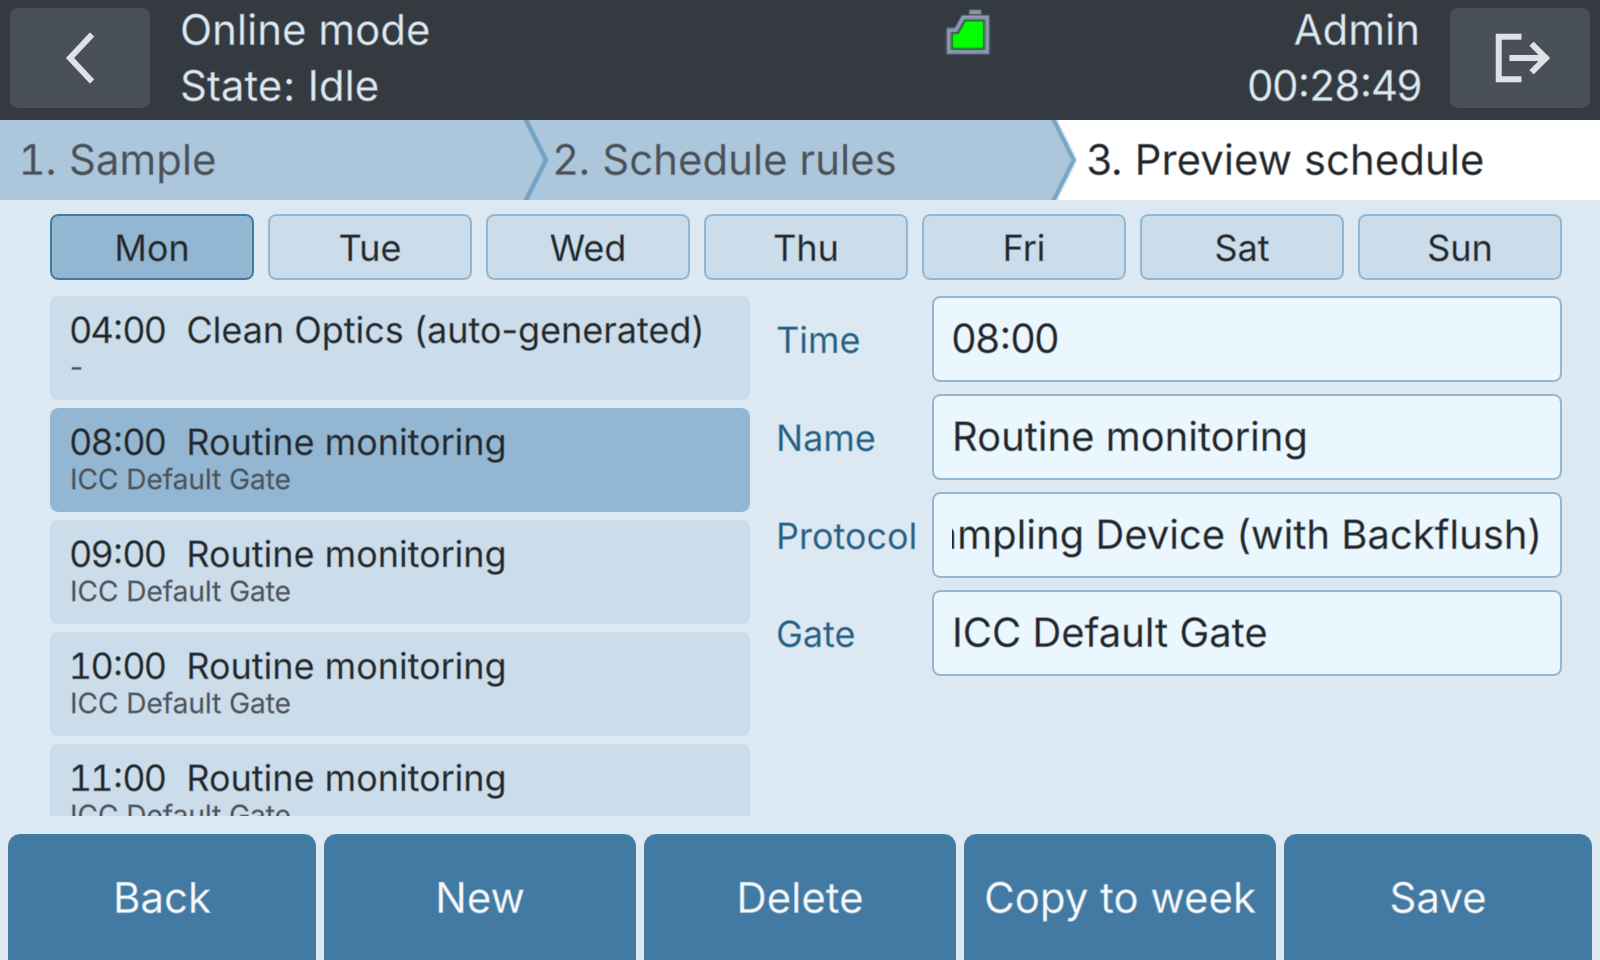
Figure 10-6 Day-by-day preview and settings for the selected entry
| WORK STEP | ADDITIONAL INFO / IMAGES | |
|---|---|---|
| 1. | Select a weekday, then an entry in the left-hand list. | The fields on the right show that entry's settings. |
| 2. | Tap Time, Name, Protocol or Gate to change the selected entry. | A change applies to that entry. Check the gate again if you change the protocol. A Line field is also available for protocols using BactoSwitch.  |
| 3. | Press New to add an entry to the selected day, then adjust its fields. To remove an entry, select it and press Delete. | Check the new entry's time, protocol and gates before saving.  |
| 4. | Use Copy to week only if every day should have the same entries as the selected day. Acknowledge the confirmation with OK. | This replaces the other days' entries in the draft, including weekend entries and day-specific exceptions. Review all seven days afterward.  |
| 5. | Press Save, then answer Start scheduler now? as described above. | If saving fails, review the message and correct the conflicting times or missing settings before retrying. |
Back returns from the preview to the rules. Changing a rule and generating a new preview can replace individual entry adjustments. Make those adjustments after the final rule preview and review them before saving.
Change an existing schedule or return to a simple interval
While the scheduler is running, open Home → Settings → Online mode settings → Schedule interval. Edit the weekly rules, press Preview, review the entries and press Save. If the scheduler is stopped, use Start on the Online mode Home screen to reopen the measurement wizard.
To use one constant interval again, press Back from the preview to the rules, then Back to the simple interval screen. Choose the interval and confirm with OK in Schedule interval, or Start in the measurement wizard. Confirming the simple schedule replaces the advanced weekly plan; pressing Back alone does not apply the change.
10.3 Measuring in manual mode
Measuring in manual mode describes a configuration, in which the manual sampling device is connected to the BactoSense, and the operator attaches individual grab samples collected in 5 mL screw cap tubes to the instrument.
10.3.1 Performing a measurement in manual mode
The following instructions show how to configure and start a measurement in manual mode.
| WORK STEP | ADDITIONAL INFO / IMAGES | |
|---|---|---|
| 1. | Make sure the manual sampling device is tightly installed as described in Installation of the manual sampling device. | |
| 2. | If the manual sampling device has been newly installed or the instrument has been switched off or idle for more than 3 days, it is recommended to clean the sampling device. If a Washstation is available, follow the procedure in Clean manual sampling device with Washstation, otherwise the procedure in Clean manual sampling device with basic cleaning. | |
| 3. | If a cleaning of the manual sampling device has been conducted (see previous step), it is recommended to perform a prime prior to measuring the sample. Follow the procedure in Performing a Prime. | |
| 4. | Navigate to the Home screen of the BactoSense user interface. | |
| 5. | On the Home screen, press Mode and select Manual mode. Press Back, then Measure to open the measurement wizard. | |
| 6. | Select Water Analysis from the list of available protocols. | If you want technical replicates, select the number of replicates in Replications column. By default, one sample is measured. If more replicates are configured, multiple samples are drawn from the same sample tube. |
| 7. | Enter a sample name by tapping into the Sample name text field, entering the name and pressing OK. | |
| 8. | Check whether your desired gate is configured in the Gates field. If you wish to use another gate, tap into the Gates field and select the desired gate from the available options (depending on the cartridge installed). | Generally, default TCC and ICC gates are used. Use user-defined gates if your application requires it. Creating and adjusting gates is described in Results and Data Analysis. |
| 9. | Press the Next button. | |
| 10. | Attach a 5 mL screw-cap tube containing 2 – 5 mL of sample to the manual sampling device. | |
| 11. | Press the Start button. | The estimated protocol duration and expected termination timepoint are displayed. The current state of the measurement is indicated in the top bar (e.g. Initializing, Mixing...) |
| 12. | After finishing the measurement, press Next to view the results. Results are explained in Measurement results. | |
| 13. | If you want to proceed with the next measurement, press the New button. | |
| 14. | If you want to see previous measurement results, press the View results button. | |
| 15. | If you want to rename, regate or export the measurement, refer to the instructions in following sections. | |
| 16. | If you don’t want to measure more samples and the instrument will be idle or switched off, perform a cleaning of the manual sampling device. If a Washstation is available, follow the procedure in Clean manual sampling device with Washstation, otherwise the procedure in Clean manual sampling device with basic cleaning. |
10.4 Renaming measurements
Measurements can be renamed from their result details view.
| WORK STEP | |
|---|---|
| 1. | On the Home screen, press Settings, then Logs, and select Results (manual mode) or Results (online mode). |
| 2. | In the results list, select the measurement you want to rename. Exception: If you want to rename a group of replicates (see Working with measurement replicates), long- press on the group of replicates and then press the rename button. |
| 3. | In the result details view, press the Rename button (see Measurement results). |
| 4. | A keyboard and text field with the current sample name will appear. Use the keyboard to change the sample name and press OK. |
10.5 Working with measurement replicates
When working in manual mode, analysis protocols can be repeated. This is particularly useful for generating technical replicates of a single sample.
- The number of replicates can be selected when configuring a manual measurement, as described in Performing a measurement in manual mode.
- In the manual mode results list, replicates are grouped into one entry, and the number in brackets next to the sample name indicates the number of replicates. In this view, the results shown for the replicate group consist of average and standard deviation. Individual replicate measurements can be accessed by pressing on the replicate group.
- Replicate groups can easily be renamed, deleted, exported or regated after a long-press on the replicate group in the manual mode results list.
10.6 Regating measurements
Adjusting the gates of individual measurements or a set of measurements is described in Change gates.
10.7 Filtering measurements
Filtering can be applied to display a subset of the measurement results. Filtering by text and date range is possible.
| WORK STEP | |
|---|---|
| 1. | On the Home screen, press Settings, then Logs, and select Results (manual mode) or Results (online mode). |
| 2. | In the results list, press the Filter button. |
| 3. | Specify your filter by applying one or both of the following options: • Define a date range by specifying start and end date • Define a text string to filter by measurement name |
| 4. | Press OK. The result list will be refreshed showing filtered results. |
10.8 Exporting measurements
There are multiple ways to retrieve measurement data. Retrieval via HTTP, HTTPS, FTP and the web interface are described in Data Access and Export and Web User Interface. In this section, data export to a USB drive is described.
10.8.1 Export to a USB drive
It is possible to export selected or all measurements to a USB flash drive.
Make sure your USB flash drive is formatted in FAT32 format.
| WORK STEP | |
|---|---|
| 1. | On the Home screen, press Settings, then Logs, and select Results (manual mode) or Results (online mode). |
| 2. | In the results list: • Press Export series, choose the date range and optional name filter, then press OK to export a series. • Long-press a replicate group, then press Export to export that group. • Open a single measurement, then press Export to export only that measurement. |
| 3. | In the folder name field, the name of the target folder which will be created on the USB drive is shown. Change the name if desired. |
| 4. | Insert a USB stick with enough available memory. Press Refresh list to display the connected USB stick. |
| 5. | Export options • press Export results to export only the basic results (see details in the user interface) • press Export all to export results, raw data and diagnostic information (see details in the user interface) |
| 6. | Wait for the export to complete and then press OK. |
10.9 Available analysis and maintenance protocols
10.9.1 Overview of protocols in manual mode
Operators can choose between two analysis protocols in manual mode.
Table 10-1 Analysis protocols for manual mode
| PROTOCOL NAME | PROTOCOL DESCRIPTION |
|---|---|
| Water Analysis | Analyze a water sample and finish with a cleaning cycle. If several replications are executed, the cleaning step is executed only once, at the end. A prime is executed automatically between replicates. |
| Beads Analysis | This protocol is intended for the analysis of calibration beads and is used with the Validation Kit. The protocol automatically finishes with a cleaning cycle. If several replications are executed, the cleaning step is executed only once, at the end. |
Maintenance protocols can be executed before or between analysis protocols, to prepare, flush, or clean the system. In manual mode, the following maintenance protocols are available:
Table 10-2 Maintenance protocols for manual mode
| PROTOCOL NAME | PROTOCOL DESCRIPTION |
|---|---|
| Clean Optics | Launches a cleaning step that washes all components in contact with the sample inside the BactoSense, except the sampling device. |
| Clean Sampling Device with Washstation | Cleans the manual sampling device such that the outside filter, the needle's interior and exterior can be fully washed between measurements, after a dirty sample or in case of filter blockage. The Washstation device must be mounted on the manual sampling device and a cartridge must be installed for this protocol to appear. This protocol has a higher disinfection power than the Clean Sampling Device protocol and should therefore be preferred. Using the Washstation is the best way to keep the manual sampling device clean and to avoid cross- contaminations. Instructions for this protocol can be found in Clean manual sampling device with Washstation. |
| Clean Sampling Device | Cleans the sampling device so that the external filter and the needle’s interior can be washed after an extremely loaded sample or in case of filter blockage. Instructions for this protocol can be found in Clean manual sampling device with basic cleaning. |
| Fill Tubing | Fills all tubing carrying reagents from the cartridge, to remove bubbles in the tubing. Cleans optics at the end of the process. |
| Prime and Clean Optics | Fills the tubing with liquid from the sample. Helps to dilute any residues after a clean sampling device for instance. Is finished by the cleaning step. |
| Prime | Loads sample into the instrument. Instructions can be found in Performing a Prime. |
10.9.2 Overview of protocols in Online mode
Operators can choose between two analysis protocols in Online mode. Table 10-3 Analysis protocols for Online mode
| PROTOCOL NAME | PROTOCOL DESCRIPTION |
|---|---|
| Online Sampling Device (with Backflush) | This is the standard protocol to be used with the online sampling device. This protocol includes automated cleaning procedures between measurements. |
| Manual Sampling Device | This protocol is used with the manual sampling device installed. |
10.9.3 Performing a Prime
Priming preconditions the BactoSense with the sample. Priming can be used to reduce the carryover of cells or unwanted substances, and takes approximately 5 minutes.
Use a Prime under the following circumstances:
- After a Clean Sampling Device protocol (with and without Washstation)
- After measuring a sample with a high chlorine concentration or any other unwanted substance which may affect subsequent measurements
| WORK STEP | |
|---|---|
| 1. | Make sure the manual sampling device is tightly installed as described in Installation of the manual sampling device. |
| 2. | Navigate to the Home screen of the BactoSense user interface. |
| 3. | On the Home screen, press Mode and select Manual mode. Press Back, then Measure to open the measurement wizard. |
| 4. | Select Prime from the list of available protocols. |
| 5. | Press the Next button. |
| 6. | Attach the sample you want to measure next to the manual sampling device. |
| 7. | Press the Start button. |